‘Mac’ カテゴリーのアーカイブ

murave

Docker Desktop for Mac さん、API無反応で起動に失敗しがち

Docker Desktop 使ってますか?

ボクの開発環境はもうどっぷりと依存してます。
大抵の開発で必須なので動かなくなると復旧するまでなにもできなくなります。

そんな、 Docker Desktop for Mac さんですが、このところかなり頻繁にAPIが反応しない的なメッセージをよこして起動に失敗します。
そしてメッセージについてくる対処用のボタンをクリックしても無反応で Docker Desktop に対して何もできなくなります。

最初は本当にビビりましたが、繰り返すうちに慣れ、なんとなく理由も想像できてきました。

よく発生するのはOSの更新直後の再起動後、Mac自体が異常終了したあとの起動後です。
どうもOSのバックエンド処理がガンガンに負荷を上げているために Docker のAPIが反応を返せず起動に失敗するようです。

まぁ、想像ですけど。

しばらく待ってバックエンド処理が落ち着いてから再起動をOSの再起動を行うと良いようです。
すぐに再起動してもバックエンド処理が落ち着いてなくてまた失敗したりしますので、まずは落ち着いてコーヒーでも淹れてきましょう。

たいした内容ではないのですが、無駄にドキドキさせられたので記事にしてみました。

murave

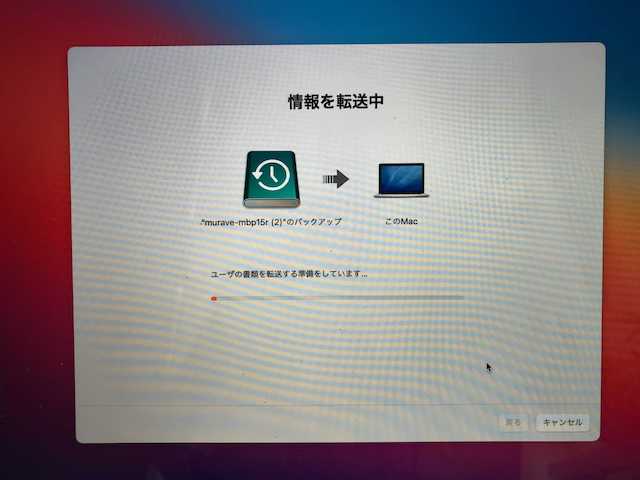
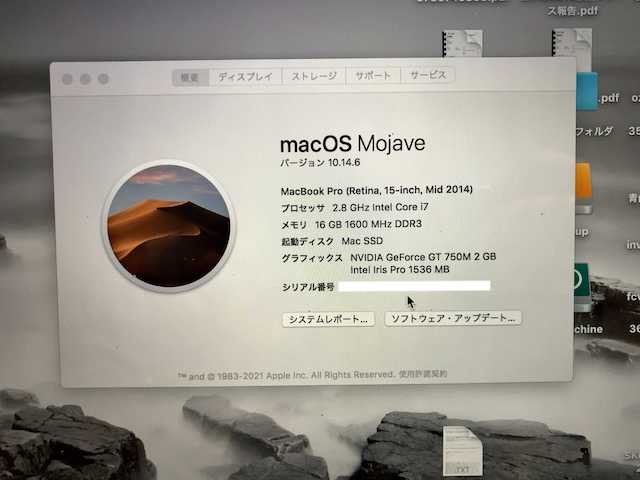
Macの移行で復元してみたらOSが巻き戻った!けど残念…って話

開発環境に Macbook Pro の15インチを使用しつづけて結構な年月が経ちました。

(壊れたりで)数回ハードの変更はありましたが、OSを更新すると各プロジェクトの環境調整が必要になるということもあり、Mojave でOSの更新を止めてました。ハードが Big Sur 非対応ってのもありましたが。

このまま Intel Mac が滅びるまで添い遂げるつもりだったのですが、タッチパッドが死んでしまいハードを変更することになりました。なってしまいました。

Apple Sillicon なマシンで開発全てがどうにかなってる未来が来る前に!
そんな未来は来ない可能性も高いですけども(Windows も絡んでるんでなぁ)

愚痴でした。本題に入ります。

新しいマシンを用意していただいたのですが、今の時代OSは Big Sur になってます。正直「Intel Mac 使ってる間は Mojave でいいけどなぁ」というお気持ち。

そんな中 TimeMachine のバックアップからデータ移行する方針で情報を集めていたらこんな情報にブチ当たりました。

データ移行について教えてください
(https://discussionsjapan.apple.com/thread/250758270)

最終的にこのケースは、「移行」ではなく、「復元」をするように指示があり、やってみたところ無事に新しいMacの方にデータを移すことができました。アップルのどのページにも、新しいマックにデータを移す際に、「復元」するということは書いていなかったと思いますので、どういうことなのか僕にはよくわかりませんが、同じような問題に直面している方がいらっしゃいましたら、参考になさってください。
えっ、復元したって、新マックはhigh sierraになったのですか? はい、どういうわけかそうなりました。そんなやり方はどこにも書いてないと思います。

「な、なんだってー!?」(やり取りの一部を抜粋してます)

新しいバージョンのOSが入ってる Mac に旧バージョンな TimeMachine バックアップを復元すると旧バージョンに戻るってこと?

せっかくだからダメ元で試してみました。
Big Sur が入ってる Mac で Mojave な TimeMache から復元してみる。

復元の手順で処理始まった! 完了後に確認してみると

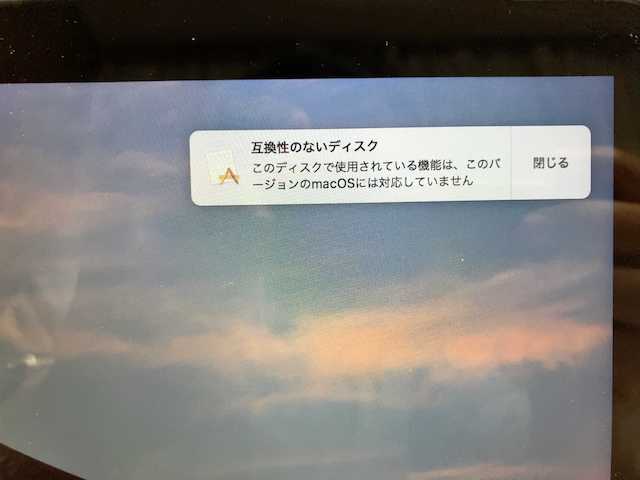
マジ Mojave やん。 しかし

Mojave も APFS には対応していると思うのですが。

検索してみたところこんな記事がありました。

https://applech2.com/archives/20200701-macos-11-big-sur-beta-apfs-container-issues.html

ちょうど携わっていたプロジェクトが終わって余裕ができたタイミングだったので、深くは追わずに覚悟をきめて Big Sur にバージョンを上げることにしました。

まぁ、面白いものが見れた。

それから数日、WWDC後のぼく

今環境構築してるMacbook ProさんがMontereyの対象外だった件
— murave (@murave) June 7, 2021
murave

Mac からのリモートデスクトップ接続で日本語キーボード使う

muraveです。仕事では日本語キーボードな Mac を使ってます。

Windows Server でがんばる系のお仕事がきそうなのでクラウド上に実験環境を作ろうと思いました。

EC2 で Windows Server インスタンスをたてる

とりあえず実験なのでAWSの無料枠からはじめましょうかね。

Amazon EC2 で Windows Server 2016 を実行

AWSで日本語版Windowsサーバーを構築する方法。初心者でもわかる!

ということでこれらのサイトを参考にさせていただき EC2 でインスタンスたてました。

順調。

リモートデスクトップで接続する

Windows インスタンスへの接続

を見ながら Microsoft Remote Desktop での接続を行いました。

このページについては接続に必要な情報の取得についてめんどうなことが長々と書くのやめて「接続ボタンをクリックせよ。そこに全部書いてある」にかえるといいと思いました。

リモートデスクトップ(RDP)接続できたので、おもむろにメモ帳などを立ち上げ、日本語入力はどうかねぇなどと試してみます。

うわ、USキーボードになってる。 「つらい」

Windows 10 / Windows Server 2016 環境でキーボード レイアウトが英語キーボードとして認識してしまった際の対処方法

を参考にさせていただいて、「英語キーボード(101/120キー)」から「日本語キーボード(106/109キー)」変更。

変化なし。Microsoft Remote Desktop 側かな?

そして決定版なページ発見! ありがてぇ

Mac からのRDP 接続で日本語キーボードを設定する

Microsoft Remote Desktop はやめて Parallels Client を使うのが良い模様。

しかし、Parallels Client でつなぎ直してもすぐには解決せず。

ごちゃごちゃと色々な事を試していましが、ふと「どこかで設定がキャッシュされてたり?」と思い Windows Server と Mac の両方をリブート、つなぎ直したら日本語キーボードが認識されました!

Mac 側について「ことえり」じゃなきゃだめといった情報もありましたが、私の環境だと「Google 日本語入力」でも大丈夫な感じです(様子見中)

余談1

Wireshark でパケットをながめてみたりもしましたがRDPのパケット、わからなかったです。

余談2

最近また「Web系でMac多いのなんで?」みたいな話をみたのですが、私の場合は

  • macOSは(ライセンス的に)Macでしか動かせないがWindowsはVMなどでどうにかなる
  • iPhone関係の開発のため
  • WindowsよりはWeb関係の開発環境を整えるのが楽(たぶん)

って感じです。

Windows 関係の開発もするので Windows 側が改善されてきたら戻りたい気持ちもありますが、今のところは仕事は Mac かなぁといった感じ。家では、Windows 使ってることが多いんですけどね。Macbook もありますけどほぼ iTunes 専用。

murave

Docker for Mac の使用されていないデータボリュームを削除

murave@ファイルの権限絡みで -v オプションの事を調べていたら今日という日が終わりそう、です。

やりたいことは別にあったんですが、せっかく調べたのでメモを残しておきます。今回、結論は最後に書くので経緯とか読みたくない方は最後まで飛ばして下さい。

データボリュームっていうのは例えば、

$ docker run -v コンテナ上のディレクトリ名 busybox
$ docker volume create --name test-volume
などとすると、

$ docker volume ls
DRIVER VOLUME NAME
local 17e11ebb9fc56e18d99b175d77b0c37b90da561bff07d601279ab7bfc0b0f414
local test-volume
と言った感じでデータボリュームがホスト上に出来ます。
ランダム文字列な名前のほうは前記docker runのように名前未指定な場合によろしくやってくれてるわけです。問題なのが、コンテナを削除しても基本的にこれが残るってこと。

「開発用RDBをゲットだぜ」シリーズの調査中

$ docker rm -f $(docker ps -aq)
でバンバン動作しているコンテナを含めて全部削除しまくっていたのですが、datastoreのデータボリュームが残りまくっているってわけです。

消さねばならぬ。

Macの何処につくられているのだろう?と調べていたのですが、Docker for MacもVMベースで動作しているわけでして、

~/Library/Containers/com.docker.docker/Data/com.docker.driver.amd64-linux/Docker.qcow2
の中にDockerイメージ共々はいってるんだと思います。こいつ、どんどん膨らみます。

VM上の状況は

$ docker run --rm -it -v /:/vm-root alpine ls -l /vm-root/var/lib/docker/volumes
total 220
drwxr-xr-x 3 root root 4096 Aug 15 08:16 0f2fee8ea1b621774905898b5fb22b79478251f0e6d3901dde5698e9430cfc0f
drwxr-xr-x 3 root root 4096 Aug 16 07:58 15bc83ca3604af4ca66713e3388dd879722ceca30ffcdc3fc05763d75b3dd077
drwxr-xr-x 3 root root 4096 Aug 26 07:23 17e11ebb9fc56e18d99b175d77b0c37b90da561bff07d601279ab7bfc0b0f414
drwxr-xr-x 3 root root 4096 Aug 23 02:08 18e959a82fa5e40f1d02facba9924d6f06f18aa2c2da2c6e07dd3a1c7e429f3a
drwxr-xr-x 3 root root 4096 Aug 16 08:38 261353597aeb63143e38b51306cba073835251795614fa7d3a43ee49008d5756
drwxr-xr-x 3 root root 4096 Aug 16 08:01 3326a3b193cc8e6bce214fd3c33fcc4f10c1317e92959e70c3752d3df83eb771
drwxr-xr-x 3 root root 4096 Aug 16 06:58 33844fb90eb4326f978bc35caf2cb244d5a66d211b4164fcb5130be2a7453c63
drwxr-xr-x 3 root root 4096 Aug 15 08:31 3adc5ccfbd90b059ce8a9fe55034411d0b49d97d18cd00147a11dcc49d7cef3b
drwxr-xr-x 3 root root 4096 Aug 16 05:20 42754f3ef91f7460cb31295de09d203a1c25097051b70451f356fde334efea0a
drwxr-xr-x 3 root root 4096 Aug 16 08:42 4b90ee03c48f0a328ba261cb9174dd62f9f167d544b73576db5171270d17b262
drwxr-xr-x 3 root root 4096 Aug 16 02:23 4e755fcf6804123343e9b40a681dbe5fc9de280cd526497d0afcf89cec963534
drwxr-xr-x 3 root root 4096 Aug 22 08:46 5ce13286a385bd714468174491c9f65bbb9e05e8bdfc4628d89a85b437344351
drwxr-xr-x 3 root root 4096 Aug 16 06:23 63a9fca8324a2e462901a6a92ebbdf08a82fbe50268771353c0017a9ef799f45
drwxr-xr-x 3 root root 4096 Aug 16 06:57 76e7e31984beea2b91d340e91fa20011c69b4922e0c2f22be1c290d75e45b82d
drwxr-xr-x 3 root root 4096 Aug 16 07:46 834badee4c6ae6290f6879779e33885772b962131f85496aaabd43809d6cec62
drwxr-xr-x 3 root root 4096 Aug 9 07:32 8805aaef35fe82403bfb0939cfbb3b66100f051b3bd5f52412e14a28bcb95342
drwxr-xr-x 3 root root 4096 Aug 16 09:02 96b0b5ca5c624d03c310db3e9952d1211cc7123e72aa193eb3d4515286b83c64
drwxr-xr-x 3 root root 4096 Aug 15 09:08 9c09d5123d36a349273a8b3213273317c75b7ba205316e0d6bb1b4596f5a5f01
drwxr-xr-x 3 root root 4096 Aug 16 08:28 9dc0d5b59060261c19a6db265010f975ec90597cf8a80a7a02d629917b7aa143
drwxr-xr-x 3 root root 4096 Aug 9 07:32 a00d1be583a3f80f156f5a77b98cad6687dce8772e345c7b5065e895ba46f110
drwxr-xr-x 3 root root 4096 Aug 16 07:36 a013c0992864236cbf872e33edd7063394111d7d64ce261a0bd49f3533f93612
drwxr-xr-x 3 root root 4096 Aug 15 04:40 a68f07ad252ceb73f842767ed3f2fd1a9628e0ec4b64516d8fd5371a63e1b22e
drwxr-xr-x 3 root root 4096 Aug 10 06:45 ab798f01923ecd36eaf5f92d627a16391c77f036cd9ff45ddad2f7fde6534b03
drwxr-xr-x 3 root root 4096 Aug 16 07:22 ad28856ce3de53103b2c20c7c9f32c616f1e806913c5f37d0c45984443bde92d
drwxr-xr-x 3 root root 4096 Aug 16 07:08 b381a395adf5d6237ba57ca70c8b1c7edd8834b113c204472be25e15ac44d84f
drwxr-xr-x 3 root root 4096 Aug 16 06:20 b5c2eaa2958e6679d9efbcbf915e6018314aeb90641c50368b2728c41efffc4b
drwxr-xr-x 3 root root 4096 Aug 16 09:26 ba6da465e33ee52ff58187a3104624693a5485d1d6084b6a0972a29a92a1210b
drwxr-xr-x 3 root root 4096 Aug 16 07:27 ce72509bdb23ac0791c71b4736c1e92a0d0175e5cc443616639ee8691bfe6613
drwxr-xr-x 3 root root 4096 Aug 23 02:08 d5237bdcc608de3ca3c8a513df47676330844043503dc436e8e6a8a05bb31873
drwxr-xr-x 3 root root 4096 Aug 16 08:55 d548a17a651bef16453793d79c2ff06b20d650039a68627b6736e27002bbaf0d
drwxr-xr-x 3 root root 4096 Aug 15 08:58 d56545b413bb10139f76ecee271a2477be0fe1ca92e1657ec7f57a73e6ae8806
drwxr-xr-x 3 root root 4096 Aug 16 07:14 d6230f991ce389726121d7e03fdf25b8f9bf72764cce7c93998cabca213551d9
drwxr-xr-x 3 root root 4096 Aug 15 09:09 dcd3700e965b5a6b9707e68584106820cbab895d7da99c046af9e6d36ebfd81b
drwxr-xr-x 3 root root 4096 Aug 16 07:30 e0130a6762542f69b670112cf2033f2816546293b4d5ed3189d7b89fb78ff676
drwxr-xr-x 3 root root 4096 Aug 16 08:54 e042396da246d4700a0db47a511d4f0e3214f646e2df2c034bf7056a1fc20f5c
drwxr-xr-x 3 root root 4096 Aug 10 06:52 e316debbe91c31402271ec50af58c975d6af1e345177426708c95ece630da53c
drwxr-xr-x 3 root root 4096 Aug 22 08:49 e8ed864afc8da5110fb3041182c9c26b0bb497293b0df666783d9ad1ba292854
drwxr-xr-x 3 root root 4096 Aug 15 04:54 f5d083892023106f0e17fae041da3d133c2b2ce7f334db24e285f41b1033f425
drwxr-xr-x 3 root root 4096 Aug 16 07:34 f703c284137660273a40e94bf6f2eb3f4ae0305113d8e513774be4da7a857862
drwxr-xr-x 3 root root 4096 Aug 15 08:58 initdb
-rw------- 1 root root 65536 Aug 26 07:23 metadata.db
てな感じで確認できますが、こんなことを調べても動作理解以上の意味はないのでした。

なぜなら

$ docker volume ls
で必要な情報は取得できるからです。

さらに docker volume ls の -q オプションでボリューム名のみ、-f オプションのdangling=true指定でコンテナから参照されていないもの(danglingは宙ぶらりんなという意味らしい)を取得できるので大変便利。

ということで以下のコマンドを実行すると使用されていないデータボリュームが削除されます。

$ docker volume rm $(docker volume ls -q -f dangling=true)
参考
No space left on device error – Docker for Mac – Docker Forums
volume ls — Docker-docs-ja 1.12.RC ドキュメント

murave

Docker公式イメージで開発用RDBをゲットだぜ(MariaDB、Percona Server編)

まえがき

Docker公式イメージで開発用RDBをゲットだぜ(PostgreSQL編)
Docker公式イメージで開発用RDBをゲットだぜ(MySQL編)

に続き予定どおりMariaDB編をお送りします。一言で済むので結論を書くと

「公式イメージのページを読み比べたらMySQLと同じでした。ありがとうございます」

という内容です。ついでに

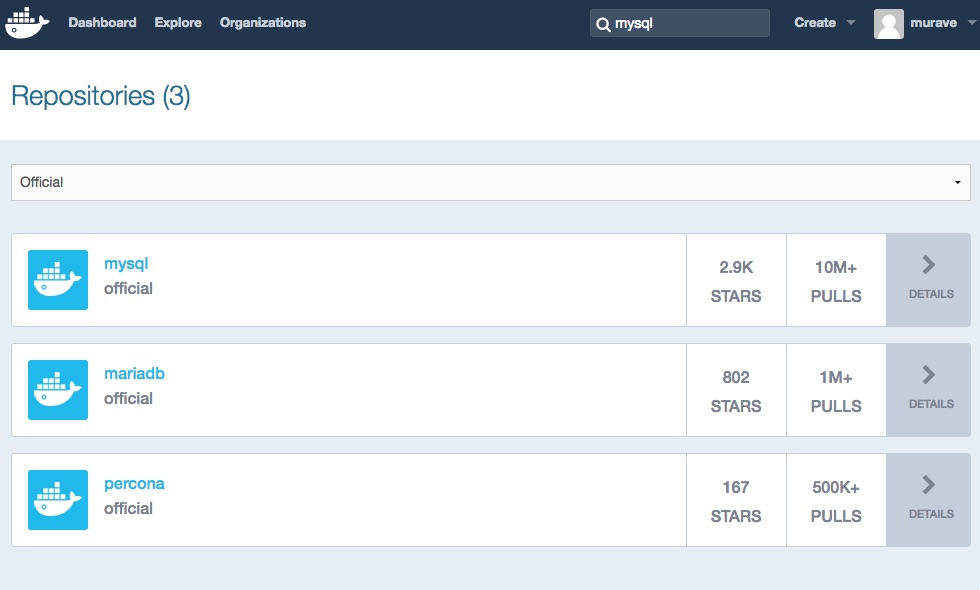
Docker Hub で Official縛りでMySQLを検索したらPerconaも出てきたので思い出したりした。定期的にPercona良さそうだなぁと思って名前を忘れるを繰り返す存在。
— murave (@murave) 2016年8月16日

というわけでPercona Serverの公式イメージのページも見てみたらこれもMySQLの場合と同じ扱いでしたので含めてみましたよ。

Docker for Macを使用しております。

MySQL派生RDBMS達の公式イメージ

まえがきに引用したTwitterのつぶやきにあるようにDocker HubでOfficial縛りでMySQLを検索しました。

Docker HubでOfficial縛りでMySQLを検索

この様に3件引っかかります。

MariaDBとPercona ServerはMySQL派生のRDBMSです。概要をつかみやすいかと思うページへのリンクをあげておきますね。

MariaDB – Wikipedia
MySQL 互換のDB、Percona Server を使う理由 – Qiita

個人的に、これからはMySQLよりMariaDBを使うことが多くなりそうに感じておりますし、以前からPercona Serverは良さそうだと思っていました(そして忘れる)。

これらの公式イメージのページを読み比べた所、設定用の環境変数の名称も含めてMySQLと同じで、扱いかたはほぼ同じと考えて良いのではないかと思います。

というわけで、調査はすっとばしてMySQL用に作成したファイルをベースにイメージの日本語化とDocker Composeでの起動をしてみようと思います。

基本的に変更点だけ書いていきますのでベースについては前回MySQLの記事をご参照ください。

MariaDB

OFFICIAL REPOSITORY mariadb

2016年8月中旬現在の対応バージョン。

10.1(10.1.16), 10.0 (10.0.26), 5.5(5.5.51)

デフォルトで選択されるlatestは10.1系。今回は10.1系で進めます。

日本語化されたイメージの作成

default localeを設定するDockerfileを作ります。

Dockerfile

FROM mariadb:10.1

MAINTAINER murave

RUN apt-get update && apt-get install locales -y && localedef -i ja_JP -c -f UTF-8 -A /usr/share/locale/locale.alias ja_JP.UTF-8
ENV LANG ja_JP.utf8
日本語化されたイメージ、mariadb_jp:10.1を作ります。

$ docker build -t mariadb_jp:10.1 ./
確認

$ docker images
REPOSITORY TAG IMAGE ID CREATED SIZE
mariadb_jp 10.1 3fa6fd548f5b 11 seconds ago 420.8 MB
mariadb 10.1 9a0138c02438 3 weeks ago 391.6 MB
参考に元の公式イメージも載せましたが、サイズが結構でかいですね。

Docker Compose で起動する

docker-compose.ymlを調整。ポートフォワードは23306に設定しました。

docker-compose.yml

datastore:
image: busybox
volumes:
- /var/lib/mysql
container_name: mariadb-datastore

mariadb:
image: mariadb_jp:10.1
environment:
MYSQL_ROOT_PASSWORD: mysecretpassword
MYSQL_USER: foo
MYSQL_PASSWORD: foopassword
MYSQL_DATABASE: foodb
volumes:
- ./conf.d/:/etc/mysql/conf.d
- ./initdb/:/docker-entrypoint-initdb.d
ports:
- "23306:3306"
volumes_from:
- datastore
container_name: mariadb-db
起動します。

$ docker-compose up -d
Creating mariadb-datastore
Creating mariadb-db
起動状態の確認。

$ docker ps -a
CONTAINER ID IMAGE COMMAND CREATED STATUS PORTS NAMES
ad95de15a67a mariadb_jp:10.1 "docker-entrypoint.sh" About a minute ago Up About a minute 0.0.0.0:23306->3306/tcp mariadb-db
3515029a71b5 busybox "sh" About a minute ago Exited (0) About a minute ago mariadb-datastore
Sequel Pro を使いポートフォワードした23306にユーザーfooでfoodbデータベースに接続して初期化スクリプトが動作していることを確認できました。

クライアントコンテナでの接続用に作成したclientスクリプトを調整。

client

docker run -it --link mariadb-db:mysql --rm mariadb_jp:10.1 sh -c 'exec mysql -h"$MYSQL_PORT_3306_TCP_ADDR" -P"$MYSQL_PORT_3306_TCP_PORT" -uroot -p"$MYSQL_ENV_MYSQL_ROOT_PASSWORD"'
接続して動作確認します。

$ ./client
Welcome to the MariaDB monitor. Commands end with ; or \g.
Your MariaDB connection id is 5
Server version: 10.1.16-MariaDB-1~jessie mariadb.org binary distribution

Copyright (c) 2000, 2016, Oracle, MariaDB Corporation Ab and others.

Type 'help;' or '\h' for help. Type '\c' to clear the current input statement.

MariaDB [(none)]> SHOW DATABASES;
+--------------------+
| Database |
+--------------------+
| foodb |
| information_schema |
| mysql |
| performance_schema |
+--------------------+
4 rows in set (0.00 sec)

MariaDB [(none)]> select Host, User from mysql.user;
+------+------+
| Host | User |
+------+------+
| % | foo |
| % | root |
+------+------+
2 rows in set (0.00 sec)

MariaDB [(none)]> USE foodb;
Reading table information for completion of table and column names
You can turn off this feature to get a quicker startup with -A

Database changed
MariaDB [foodb]> SHOW TABLES;
+-----------------+
| Tables_in_foodb |
+-----------------+
| users |
+-----------------+
1 row in set (0.00 sec)

MariaDB [foodb]> SELECT * from users;
+------+--------+
| id | name |
+------+--------+
| 1 | first |
| 1 | second |
+------+--------+
2 rows in set (0.00 sec)

MariaDB [foodb]> exit
Bye
Percona ServerOFFICIAL REPOSITORY percona

2016年8月中旬現在の対応バージョン。

5.7(5.7.13), 5.6 (5.6.32), 5.5 (5.5.51)

MariaDBと違ってMySQL準拠ですね。latestは5.7系。今回は5.7系で進めます。

日本語化されたイメージの作成

default localeを設定するDockerfileを作ります。

Dockerfile

FROM percona:5.7

MAINTAINER murave

RUN apt-get update && apt-get install locales -y && localedef -i ja_JP -c -f UTF-8 -A /usr/share/locale/locale.alias ja_JP.UTF-8
ENV LANG ja_JP.utf8
日本語化されたイメージ、percona_jp:5.7を作ります。

$ docker build -t percona_jp:5.7 ./
確認

$ docker images
REPOSITORY TAG IMAGE ID CREATED SIZE
percona_jp 5.7 22e3746fb304 8 minutes ago 367.2 MB
percona 5.7 ed3fc6a159be 3 weeks ago 338.2 MB
こちらも参考に元の公式イメージも載せました。

Docker Compose で起動する

docker-compose.ymlを調整。ポートフォワードは33306に設定しました。

docker-compose.yml

datastore:
image: busybox
volumes:
- /var/lib/mysql
container_name: percona-datastore

percona:
image: percona_jp:5.7
environment:
MYSQL_ROOT_PASSWORD: mysecretpassword
MYSQL_USER: foo
MYSQL_PASSWORD: foopassword
MYSQL_DATABASE: foodb
volumes:
- ./conf.d/:/etc/mysql/conf.d
- ./initdb/:/docker-entrypoint-initdb.d
ports:
- "33306:3306"
volumes_from:
- datastore
container_name: percona-db
起動します。

$ docker-compose up -d
Creating percona-datastore
Creating percona-db
起動状態の確認。

$ docker ps -a
CONTAINER ID IMAGE COMMAND CREATED STATUS PORTS NAMES
b39630e2fd38 percona_jp:5.7 "docker-entrypoint.sh" 35 seconds ago Up 33 seconds 0.0.0.0:33306->3306/tcp percona-db
ea4c9a0a21b5 busybox "sh" 35 seconds ago Exited (0) 34 seconds ago percona-datastore
Sequel Pro を使いポートフォワードした33306にユーザーfooでfoodbデータベースに接続して初期化スクリプトが動作していることを確認できました。

クライアントコンテナでの接続用に作成したclientスクリプトを調整。

client

docker run -it --link percona-db:mysql --rm percona_jp:5.7 sh -c 'exec mysql -h"$MYSQL_PORT_3306_TCP_ADDR" -P"$MYSQL_PORT_3306_TCP_PORT" -uroot -p"$MYSQL_ENV_MYSQL_ROOT_PASSWORD"'
接続して動作確認します。

$ ./client
mysql: [Warning] Using a password on the command line interface can be insecure.
Welcome to the MySQL monitor. Commands end with ; or \g.
Your MySQL connection id is 6
Server version: 5.7.13-6 Percona Server (GPL), Release '6', Revision 'e3d58bb'

Copyright (c) 2009-2016 Percona LLC and/or its affiliates
Copyright (c) 2000, 2016, Oracle and/or its affiliates. All rights reserved.

Oracle is a registered trademark of Oracle Corporation and/or its
affiliates. Other names may be trademarks of their respective
owners.

Type 'help;' or '\h' for help. Type '\c' to clear the current input statement.

mysql> SHOW DATABASES;
+--------------------+
| Database |
+--------------------+
| information_schema |
| foodb |
| mysql |
| performance_schema |
| sys |
+--------------------+
5 rows in set (0.00 sec)

mysql> select Host, User from mysql.user;
+------+------+
| Host | User |
+------+------+
| % | foo |
| % | root |
+------+------+
2 rows in set (0.00 sec)
せっかくのPercona Serverなのでレスポンスタイム分布の取得をやってみましょう。

Response Time Distribution

を参考にPluginを導入して有効化します。

mysql> INSTALL PLUGIN QUERY_RESPONSE_TIME_AUDIT SONAME 'query_response_time.so';
Query OK, 0 rows affected (0.03 sec)

mysql> INSTALL PLUGIN QUERY_RESPONSE_TIME SONAME 'query_response_time.so';
Query OK, 0 rows affected (0.03 sec)

mysql> INSTALL PLUGIN QUERY_RESPONSE_TIME_READ SONAME 'query_response_time.so';
Query OK, 0 rows affected (0.03 sec)

mysql> INSTALL PLUGIN QUERY_RESPONSE_TIME_WRITE SONAME 'query_response_time.so';
Query OK, 0 rows affected (0.02 sec)

mysql> SHOW PLUGINS;
+-----------------------------+----------+--------------------+------------------------+---------+
| Name | Status | Type | Library | License |
+-----------------------------+----------+--------------------+------------------------+---------+
(長いので省略しました)
| QUERY_RESPONSE_TIME_AUDIT | ACTIVE | AUDIT | query_response_time.so | GPL |
| QUERY_RESPONSE_TIME | ACTIVE | INFORMATION SCHEMA | query_response_time.so | GPL |
| QUERY_RESPONSE_TIME_READ | ACTIVE | INFORMATION SCHEMA | query_response_time.so | GPL |
| QUERY_RESPONSE_TIME_WRITE | ACTIVE | INFORMATION SCHEMA | query_response_time.so | GPL |
+-----------------------------+----------+--------------------+------------------------+---------+
52 rows in set (0.00 sec)

mysql> SET GLOBAL query_response_time_stats = on;
Query OK, 0 rows affected (0.00 sec)

mysql> SELECT * from INFORMATION_SCHEMA.QUERY_RESPONSE_TIME;
+----------------+-------+----------------+
| TIME | COUNT | TOTAL |
+----------------+-------+----------------+
| 0.000001 | 0 | 0.000000 |
| 0.000010 | 0 | 0.000000 |
| 0.000100 | 0 | 0.000000 |
| 0.001000 | 1 | 0.000271 |
| 0.010000 | 0 | 0.000000 |
| 0.100000 | 0 | 0.000000 |
| 1.000000 | 0 | 0.000000 |
| 10.000000 | 0 | 0.000000 |
| 100.000000 | 0 | 0.000000 |
| 1000.000000 | 0 | 0.000000 |
| 10000.000000 | 0 | 0.000000 |
| 100000.000000 | 0 | 0.000000 |
| 1000000.000000 | 0 | 0.000000 |
| TOO LONG | 0 | TOO LONG |
+----------------+-------+----------------+
14 rows in set (0.01 sec)
おー。取れた取れた。

初期投入データのサンプルについてsecondのidを1にしているという恥ずかしい状況に気づいたのでSequel Proで編集、ついでに3:thirdを追加してから再度レスポンスタイム分布を取得してみます。

mysql> SELECT * from INFORMATION_SCHEMA.QUERY_RESPONSE_TIME;
+----------------+-------+----------------+
| TIME | COUNT | TOTAL |
+----------------+-------+----------------+
| 0.000001 | 0 | 0.000000 |
| 0.000010 | 8 | 0.000057 |
| 0.000100 | 3 | 0.000173 |
| 0.001000 | 9 | 0.001866 |
| 0.010000 | 0 | 0.000000 |
| 0.100000 | 2 | 0.058591 |
| 1.000000 | 0 | 0.000000 |
| 10.000000 | 0 | 0.000000 |
| 100.000000 | 0 | 0.000000 |
| 1000.000000 | 0 | 0.000000 |
| 10000.000000 | 0 | 0.000000 |
| 100000.000000 | 0 | 0.000000 |
| 1000000.000000 | 0 | 0.000000 |
| TOO LONG | 0 | TOO LONG |
+----------------+-------+----------------+
14 rows in set (0.00 sec)
発行されたSequel Proから発行されたクエリ文増えました。スロークエリはないですね(あたりまえ)。

気軽に試せて良いですね。
以上、「Docker公式イメージで開発用RDBをゲットだぜ」でした。

murave

Docker公式イメージで開発用RDBをゲットだぜ(MySQL編)

まえがき

Docker公式イメージで開発用RDBをゲットだぜ(PostgreSQL編)

に続きMySQL編です。Docker for Macを使用しております。はじめるよ〜。

MySQL

Dockerの公式MySQLイメージの使い方を徹底的に解説するよ

という素敵なページがありましたのでこちらも参考にさせていただこうと思います。

公式イメージを調べる

OFFICIAL REPOSITORY mysql

2016年8月中旬現在、以下のバージョンがあるようです。

5.7(5.7.14), 5.6(5.6.32), 5.5(5.5.51)

少ない気もしますが覚悟を決めて5.5以上で行きましょう。「古いMySQL死すべし」という意思を感じます。

起動する

latestは5.7系のようですので、あえて5.5系ですすめてみます。

$ docker run -d --name mysql55 -e MYSQL_ROOT_PASSWORD=mysecretpassword -p 13306:3306 mysql:5.5
公式の例を参考にコンテナの3306を13306にポートフォワードしています。

接続する

mysqlコマンドで接続します。公式の例はクライアントコンテナでenvの情報を利用して一気につなぐ方法ですね。

$ docker run -it --link mysql55:mysql --rm mysql:5.5 sh -c 'exec mysql -h"$MYSQL_PORT_3306_TCP_ADDR" -P"$MYSQL_PORT_3306_TCP_PORT" -uroot -p"$MYSQL_ENV_MYSQL_ROOT_PASSWORD"'
Welcome to the MySQL monitor. Commands end with ; or \g.
Your MySQL connection id is 4
Server version: 5.5.51 MySQL Community Server (GPL)

Copyright (c) 2000, 2016, Oracle and/or its affiliates. All rights reserved.

Oracle is a registered trademark of Oracle Corporation and/or its
affiliates. Other names may be trademarks of their respective
owners.

Type 'help;' or '\h' for help. Type '\c' to clear the current input statement.

mysql> SHOW DATABASES;
+--------------------+
| Database |
+--------------------+
| information_schema |
| mysql |
| performance_schema |
+--------------------+
3 rows in set (0.00 sec)

mysql> select Host, User from mysql.user;
+------+------+
| Host | User |
+------+------+
| % | root |
+------+------+
1 row in set (0.00 sec)

mysql> exit
Bye

便利だけど長い〜。シェルスクリプトにでもしておくのがよいでしょうか。clientというファイルに書いて実行権限を付けておきます。

$ ./client
Welcome to the MySQL monitor. Commands end with ; or \g.
Your MySQL connection id is 5
Server version: 5.5.51 MySQL Community Server (GPL)

Copyright (c) 2000, 2016, Oracle and/or its affiliates. All rights reserved.

Oracle is a registered trademark of Oracle Corporation and/or its
affiliates. Other names may be trademarks of their respective
owners.

Type 'help;' or '\h' for help. Type '\c' to clear the current input statement.

mysql>
おけおけ。PostgreSQLの方にも作っておこうかな。

次に Sequel Pro 先生で繋いでみます。13306にポートフォワードしてますので

Sequelで接続(接続情報)

サクッと繋がりました。

Sequelで操作

mysqlデータベースの中など覗いてみたり。楽ちん。

設定ファイルなど

コンテナのシェルを起動して探検してみます。

$ docker exec -it mysql55 bash
とりあえずmy.cnfを眺めてみる。

root@688eab40f1a8:/# more /etc/mysql/my.cnf
[mysqld]
skip-host-cache
skip-name-resolve
datadir = /var/lib/mysql
!includedir /etc/mysql/conf.d/
/etc/mysql/conf.d/ のcnfファイルを読み込むようになっていますね。

拡張する

いろいろな方法が用意されているようです。

まず、先ほど調べたようにコンテナの /etc/mysql/conf.d/ にcnfファイルを置くと読み込まれます。

PostgreSQLの公式イメージと同じくコンテナの /docker-entrypoint-initdb.d に拡張子がsh、sql、sql.gzのファイルを置くとコンテナ起動時に実行してくれます。mysql/5.5/docker-entrypoint.shを眺めてみたところ、

for f in /docker-entrypoint-initdb.d/*; do
case "$f" in
*.sh) echo "$0: running $f"; . "$f" ;;
*.sql) echo "$0: running $f"; "${mysql[@]}" < "$f"; echo ;;
*.sql.gz) echo "$0: running $f"; gunzip -c "$f" | "${mysql[@]}"; echo ;;
*) echo "$0: ignoring $f" ;;
esac
echo
done
このように仕組みも同じ感じでした。

他、PostgreSQLの時と同じように日本語化されたイメージを作ろうと思います。

日本語化されたイメージの作成

PostgreSQLでのやり方を参考にdefault localeを設定するDockerfileを作ります。

Dockerfile

FROM mysql:5.5

MAINTAINER murave

RUN apt-get update && apt-get install locales -y && localedef -i ja_JP -c -f UTF-8 -A /usr/share/locale/locale.alias ja_JP.UTF-8
ENV LANG ja_JP.utf8
公式イメージにはlocalesが入っていなかったのでlocaledefの前にapt-getで導入するようにしました。

日本語化されたイメージ、mysql_jp:5.5を作ります。

$ docker build -t mysql_jp:5.5 ./
確認

$ docker images
REPOSITORY TAG IMAGE ID CREATED SIZE
mysql_jp 5.5 42465a1c94d5 22 minutes ago 284.5 MB
設定ファイルの調整/etc/mysql/conf.d/ にバインドするディレクトリconf.dを作成して追加の設定を書いたcnfファイルを置きます。

conf.d/custom.cnf

[mysqld]
character-set-server=utf8
Mac上のcond.dディレクトリを/etc/mysql/conf.dにバインドするようにオプションを付けて起動します。

$ docker run -d --name mysql55 -e MYSQL_ROOT_PASSWORD=mysecretpassword -p 13306:3306 -v $(pwd)/conf.d/:/etc/mysql/conf.d mysql_jp:5.5
execでコンテナ上の/etc/mysql/conf.dのls結果を見てバインドされているか確認。

$ docker exec -it mysql55 ls /etc/mysql/conf.d
custom.cnf
おけおけ。

データベースの初期化

アカウント、データベース作成は設定用に準備された環境変数(MYSQL_USER、MYSQL_PASSWORD、MYSQL_DATABASE)を利用し、/docker-entrypoint-initdb.d ディレクトリのスクリプト実行を利用してテーブル作成などをしてみたいと思います。

ユーザーをfoo、データベースをfoodbとする前提で初期化用のsqlファイルを作ります。
initdb/01createtable.sql

CREATE TABLE foodb.users (id int , name varchar(255));
GRANT ALL ON foodb.users TO foo;
INSERT INTO foodb.users (id, name) VALUES (1, 'first'), (1, 'second')
foodbデータベースにusersテーブルを作成しユーザーfooに権限を与え、usersテーブルに初期値をINSERT文で投入というシナリオです。

/docker-entrypoint-initdb.d をバインドして起動。

$ docker run -d --name mysql55 -e MYSQL_DATABASE=foodb -e MYSQL_USER=foo -e MYSQL_PASSWORD=foopassword -e MYSQL_ROOT_PASSWORD=mysecretpassword -p 13306:3306 -v $(pwd)/conf.d/:/etc/mysql/conf.d -v $(pwd)/initdb/:/docker-entrypoint-initdb.d mysql_jp:5.5
確認します。

$ ./client
Welcome to the MySQL monitor. Commands end with ; or \g.
Your MySQL connection id is 2
Server version: 5.5.51 MySQL Community Server (GPL)

Copyright (c) 2000, 2016, Oracle and/or its affiliates. All rights reserved.

Oracle is a registered trademark of Oracle Corporation and/or its
affiliates. Other names may be trademarks of their respective
owners.

Type 'help;' or '\h' for help. Type '\c' to clear the current input statement.

mysql> SHOW DATABASES;
+--------------------+
| Database |
+--------------------+
| information_schema |
| foodb |
| mysql |
| performance_schema |
+--------------------+
4 rows in set (0.00 sec)

mysql> select Host, User from mysql.user;
+------+------+
| Host | User |
+------+------+
| % | foo |
| % | root |
+------+------+
2 rows in set (0.00 sec)

mysql> USE foodb;
Reading table information for completion of table and column names
You can turn off this feature to get a quicker startup with -A

Database changed
mysql> SHOW TABLES;
+-----------------+
| Tables_in_foodb |
+-----------------+
| users |
+-----------------+
1 row in set (0.01 sec)

mysql> SELECT * from users;
+------+--------+
| id | name |
+------+--------+
| 1 | first |
| 1 | second |
+------+--------+
2 rows in set (0.00 sec)

mysql> exit
Bye
想定通りに初期化されているようです。

スクリプト実行についての悲しい補足情報

はじめはsqlファイルではなくshファイル(シェルスクリプト)内でmysqlコマンドを呼び出して初期化しようとしていました。実際に使用するユーザーでテーブル作成やデータ投入したいじゃないですか。気分的に。

initdb/01createtable.sh

!/bin/bash
set -e

mysql -u"$MYSQL_USER" -p"$MYSQL_PASSWORD" $MYSQL_DATABASE <<-EOSQL
CREATE TABLE users (id int , name varchar(255));
EOSQL
このようなスクリプトでテーブル作成は行われるのですがshスクリプト実行後にコンテナがExitしてしまうという症状が発生。解決出来ずにハマりまくり、sqlファイルでの初期化に方針変更しました。

その後、落ち着いて公式イメージのページを見なおしていると

No connections until MySQL init completes

という項目があるのに気付きました。mysqlコマンドで接続しているのが原因っぽいですね。

Docker Compose で開発用の MySQL を起動する

日本語化したイメージを使用しconf.dのcnfファイルで設定調整、initdbのスクリプトで初期化、データの永続化はbusyboxを使用する方針でdocker-compose.ymlを作成します。

docker-composeでmysql & postgreSQL をサクッと起動

を参考にさせていただきました。

docker-compose.yml

datastore:
image: busybox
volumes:
- /var/lib/mysql
container_name: mysql-datastore

mysql:
image: mysql_jp:5.5
environment:
MYSQL_ROOT_PASSWORD: mysecretpassword
MYSQL_USER: foo
MYSQL_PASSWORD: foopassword
MYSQL_DATABASE: foodb
volumes:
- ./conf.d/:/etc/mysql/conf.d
- ./initdb/:/docker-entrypoint-initdb.d
ports:
- "13306:3306"
volumes_from:
- datastore
container_name: mysql-db
起動します。

$ docker-compose up -d
Creating mysql-datastore
Creating mysql-db
以降、使用するあいだはstop・startで停止・起動。

mysqlコマンドでの接続用のclientスクリプトのコンテナ名をmysql-dbに修正して接続して動作を確認。
Sequel Pro を使いポートフォワードした13306にユーザーfooでfoodbデータベースに接続しての操作もできました。

ディレクトリファイル構成は以下のようになりました。

.
├── Dockerfile
├── client
├── conf.d
│   └── custom.cnf
├── docker-compose.yml
└── initdb
    └── 01createtable.sql
murave

Docker公式イメージで開発用RDBをゲットだぜ(PostgreSQL編)

まえがき

Laravelでの開発時にデプロイ先はMySQLなのに手を抜いて手元の開発機ではSQLiteを使っていたら痛い目にあったりしました、muraveです。

SQLiteって結構ルーズにつかえてしまうので手元の開発でSQLite使っててMySQL運用のサーバーにデプロイするとエラーがバンバンというのが昨日から連続発生中。
— murave (@murave) 2016年7月14日

開発環境にあまり影響を与えずにサクッと開発用のRDB(Relational Database)を建てられると素敵ですね。Docker公式イメージを活用すると出来そうです。

RDBというデッカイ単語を使っていますが、自分がよく使うPostgreSQL、MySQL、MariaDBなどについて調べようと思います。MySQLとMariaDB自体はほぼ同じ扱い方ができるRDBですが、公式イメージでの扱いはどうなんでしょうね。

記事にまとめながら試していこうと思います。Docker for Macを使用しており、今回はPostgreSQLです。

PostgreSQL

公式イメージを調べる

OFFICIAL REPOSITORY postgres

2016年8月中旬現在、以下のバージョンがあるようです。

9.6(9.6-beta4) , 9.5(9.5.4), 9.4(9.4.9), 9.3(9.3.14), 9.2(9.2.18), 9.1(9.1.23)

流石に8系はないですね。使いたくないですよね。忘れましょう。客先には残ってますが。

起動する

試していきます。せっかくですから9.6でやってみようと思います。

$ docker run -d --name postgres96beta4 -e POSTGRES_PASSWORD=mysecretpassword -p 15432:5432 postgres:9.6
公式の例を参考にコンテナの5432を15432にポートフォワードなど追加しておきました。

接続する

psqlでの接続ですが、公式には別コンテナを立ち上げての接続例が載ってますね。

$ docker run -it --rm --link postgres96beta4:postgres postgres:9.6 psql -h postgres -U postgres
Password for user postgres:
psql (9.6beta4)
Type "help" for help.

postgres=# select version();
version
---------------------------------------------------------------------------------------------
PostgreSQL 9.6beta4 on x86_64-pc-linux-gnu, compiled by gcc (Debian 4.9.2-10) 4.9.2, 64-bit
(1 row)

postgres=# \l
List of databases
Name | Owner | Encoding | Collate | Ctype | Access privileges
-----------+----------+----------+------------+------------+-----------------------
postgres | postgres | UTF8 | en_US.utf8 | en_US.utf8 |
template0 | postgres | UTF8 | en_US.utf8 | en_US.utf8 | =c/postgres +
| | | | | postgres=CTc/postgres
template1 | postgres | UTF8 | en_US.utf8 | en_US.utf8 | =c/postgres +
| | | | | postgres=CTc/postgres
(3 rows)

postgres=# \q
–rm を付けてあるので抜けるとコンテナは消えます。儚い。

ポートフォワードしてあるのでMacからつなぐこともできますが、当然、psqlのバージョンはMac上のものになります。

$ psql -h localhost -p 15432 -U postgres
Password for user postgres:
psql (9.3.5, server 9.6beta4)
WARNING: psql major version 9.3, server major version 9.6.
Some psql features might not work.
Type "help" for help.

postgres=# \q
9.3用なので警告がでています。

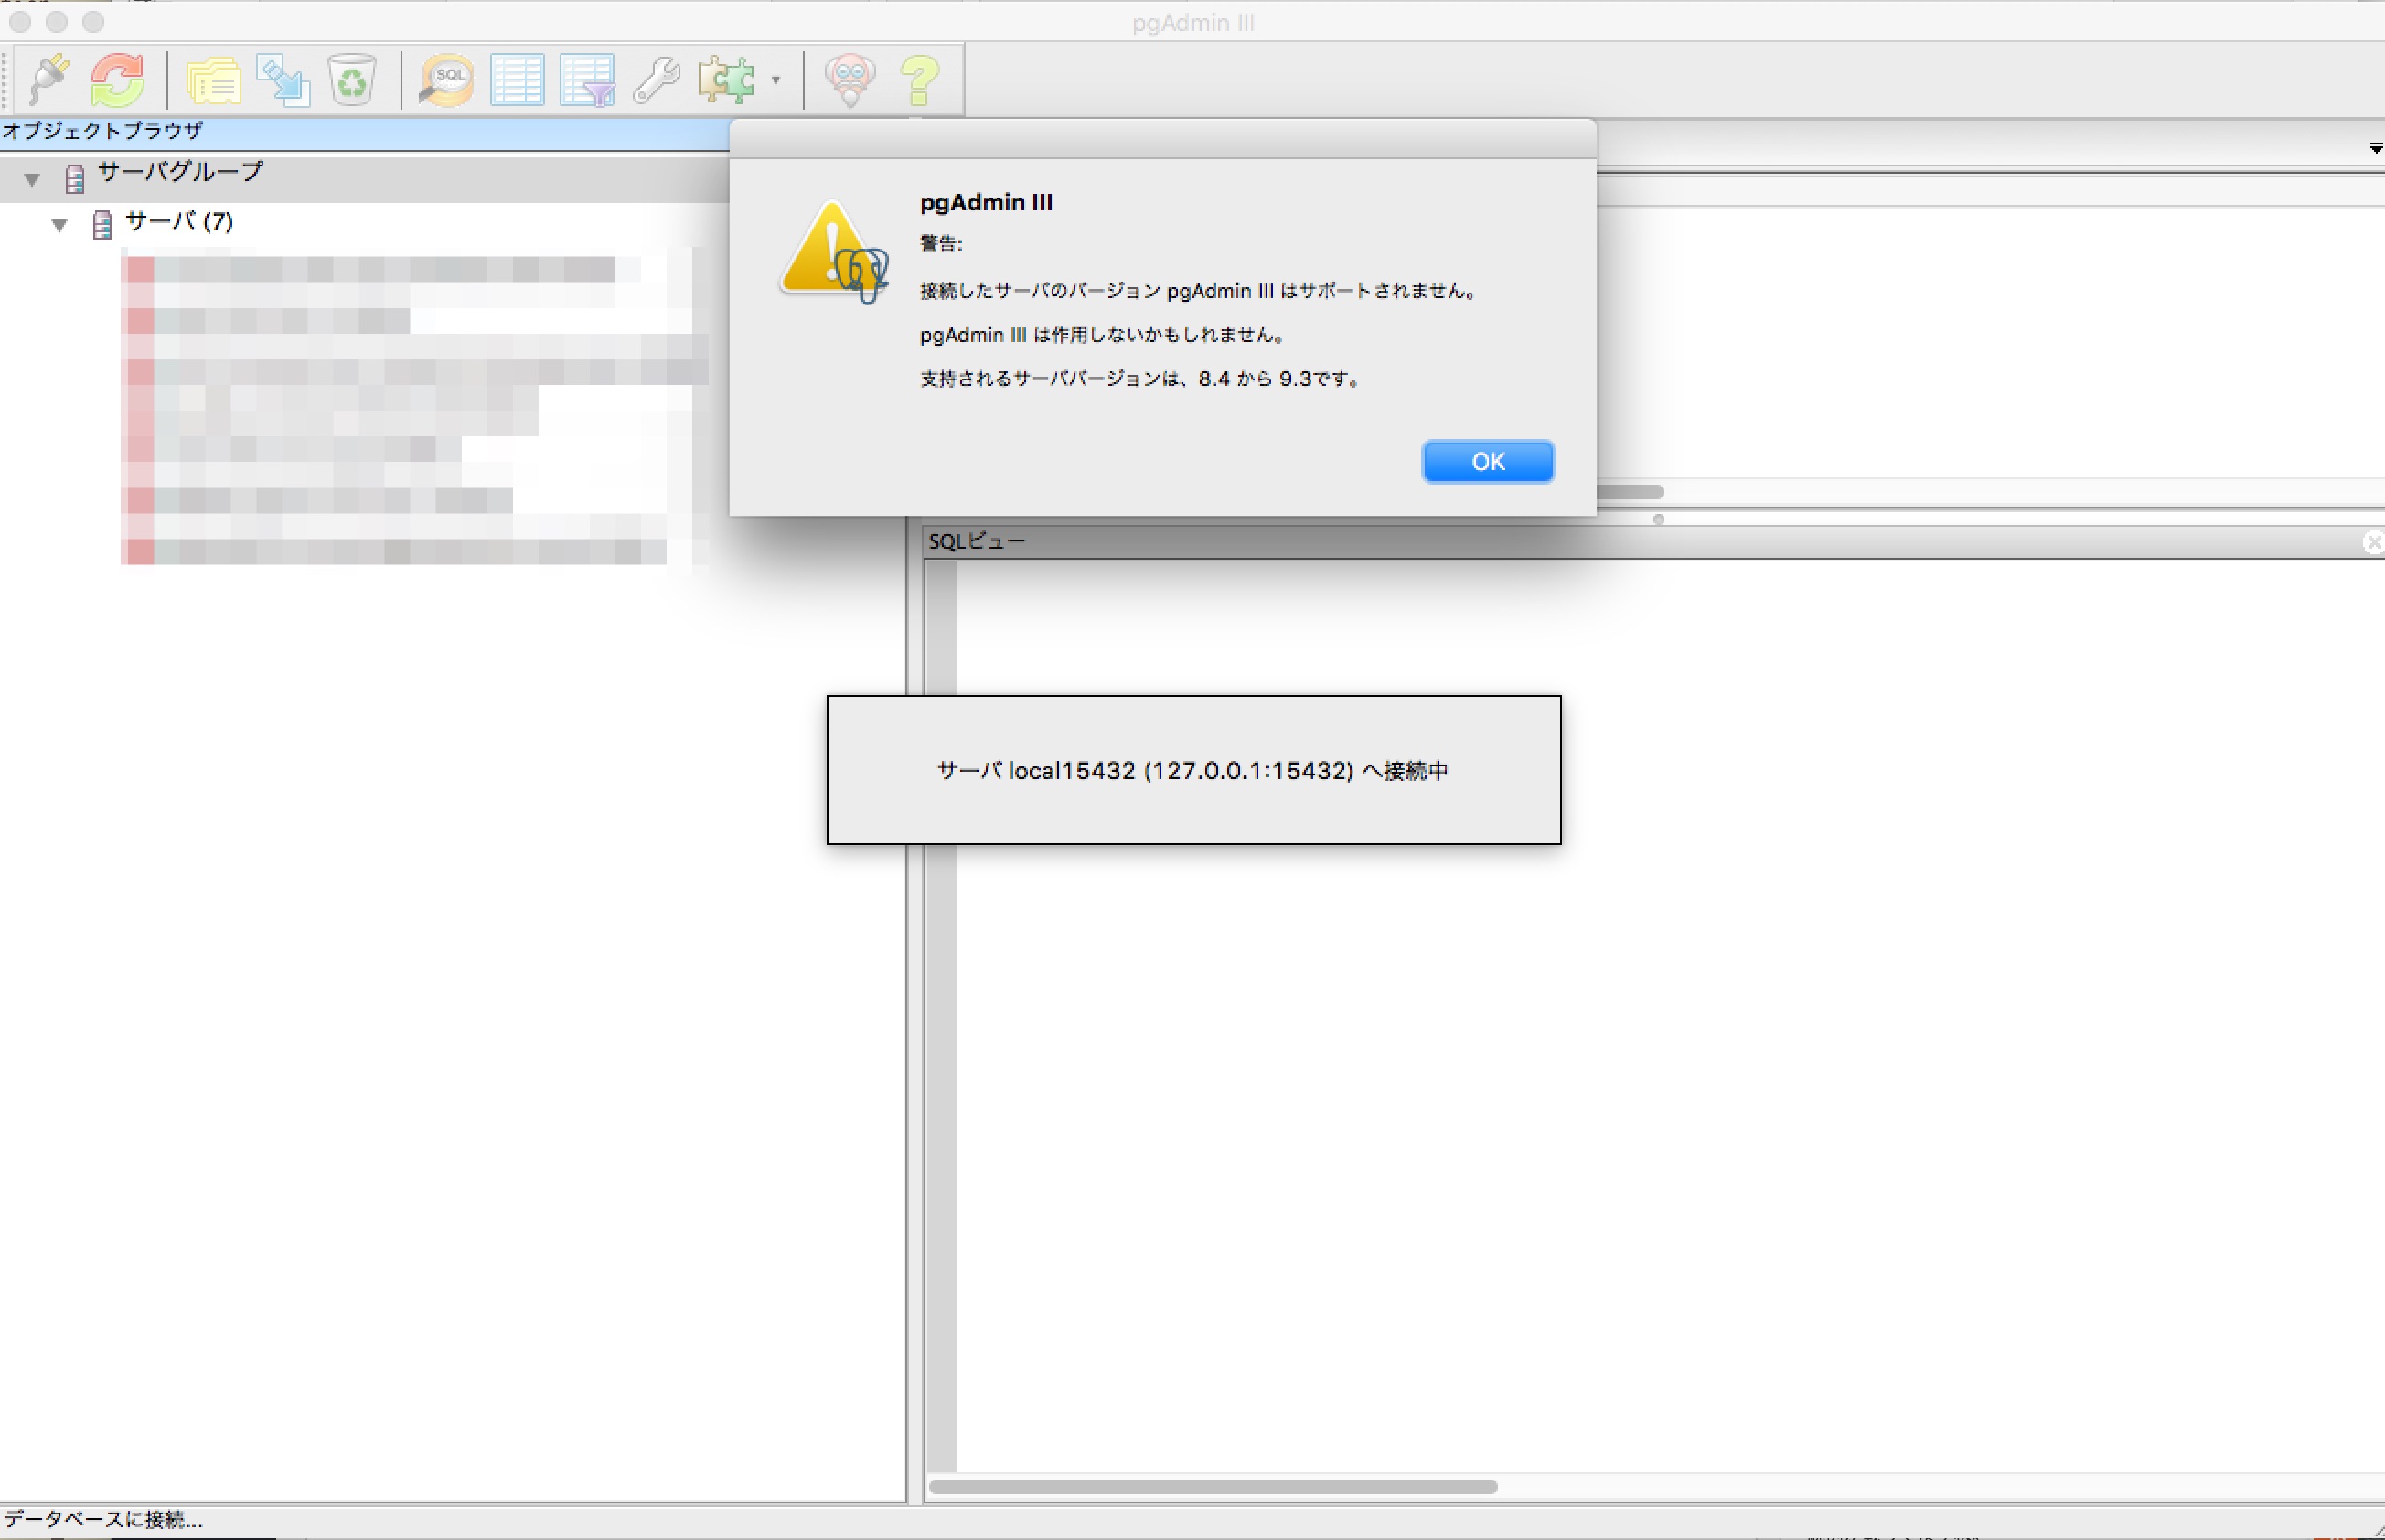
愛しのpgAdmin3でつないでみましょう。pgAdmin3も9.3用なので警告されております。

pgAdmin3でDockerコンテナ上のPostgreSQLに接続(バージョン警告)

接続はできました。

pgAdmin3でDockerコンテナ上のPostgreSQLに接続して操作

ほぼ使えましたがPostgreSQL9.6に対してツールのバージョンが9.3用と古いのでエラーがでたりもしますね。
psqlのみで作業するのはツライのでツールは対象に合わせたバージョンを用意しないとあかんなぁと思いました。

設定ファイルなど

コンテナのシェルを起動して探検。

$ docker exec -it postgres96beta4 bash
root@d2e991bd61a7:/# cd /var/lib/postgresql/data/
root@d2e991bd61a7:/var/lib/postgresql/data# more postgresql.conf
と、このようにpostgresql.confを眺めてみたり(lessもviもなかった)。

root@d2e991bd61a7:/var/lib/postgresql/data# more pg_hba.conf
pg_hba.confを眺めてみたり。pg_hba.confから抜粋しますと

# TYPE DATABASE USER ADDRESS METHOD
# "local" is for Unix domain socket connections only
local all all trust
# IPv4 local connections:
host all all 127.0.0.1/32 trust
# IPv6 local connections:
host all all ::1/128 trust

host all all 0.0.0.0/0 md5
ローカルからはtrustで他はパスワード認証ですかね。

拡張する

コンテナの /docker-entrypoint-initdb.d に拡張子がsql、shのファイルを置くとコンテナ起動時に実行してくれるそうです。
他、Dockerfileでdefault localeを設定するという例が公式のページに例として載っています。

やってみましょう。

日本語化されたイメージの作成

default localeを設定するDockerfileを作ります。

Dockerfile

FROM postgres:9.6

MAINTAINER murave

RUN localedef -i ja_JP -c -f UTF-8 -A /usr/share/locale/locale.alias ja_JP.UTF-8
ENV LANG ja_JP.utf8
日本語化されたイメージ、mypostgres:9.6を作ります。

$ docker build -t mypostgres:9.6 ./
確認

$ docker images
REPOSITORY TAG IMAGE ID CREATED SIZE
mypostgres 9.6 4b7ea9f892dd 24 seconds ago 269.2 MB
データベースの初期化操作しているディレクトリに/docker-entrypoint-initdb.d対応用にinitdbというディレクトリを作成しました。postgres/9.6/docker-entrypoint.sh を読んでみたところ

for f in /docker-entrypoint-initdb.d/*; do
case "$f" in
*.sh) echo "$0: running $f"; . "$f" ;;
*.sql) echo "$0: running $f"; "${psql[@]}" < "$f"; echo ;;
*.sql.gz) echo "$0: running $f"; gunzip -c "$f" | "${psql[@]}"; echo ;;
*) echo "$0: ignoring $f" ;;
esac
echo
done
で順次処理となっているのでファイル名順に実行されるようです。sqlをgzip圧縮したsql.gz拡張子のファイルにも対応しているようですね。

初期化時にdockerユーザーとdockerテーブルを作成するshを作成します。

initdb/01adduser.sh

#!/bin/bash
set -e

psql -v ON_ERROR_STOP=1 --username "$POSTGRES_USER" <<-EOSQL
CREATE USER docker;
ALTER USER docker WITH PASSWORD 'dockerpassword';
CREATE DATABASE docker;
GRANT ALL PRIVILEGES ON DATABASE docker TO docker;
EOSQL
次にsqlファイル内で\cでデータベースとユーザーをdockerに切り替えてテーブルを作ってみます。shでdb接続からしたほうが簡単な気がしますが、実験です。

initdb/02createtb.sql

\c docker docker

CREATE TABLE auth_group (
id integer NOT NULL,
name character varying(80) NOT NULL
);

COPY auth_group (id, name) FROM stdin;
1 Gyoumu
2 Master
3 System
\.
日本語化したmypostgres:9.6からMacのinitdbディレクトリを/docker-entrypoint-initdb.dにバインドしてコンテナを起動します。

$ docker run -d --name postgres96beta4 -e POSTGRES_PASSWORD=mysecretpassword -p 15432:5432 -v $(pwd)/initdb:/docker-entrypoint-initdb.d mypostgres:9.6
psqlで繋いで確認してみます(一応mypostgres:9.6イメージの方のものを使用)。

$ docker run -it --rm --link postgres96beta4:postgres mypostgres:9.6 psql -h postgres -U postgres
ユーザ postgres のパスワード:
psql (9.6beta4)
"help" でヘルプを表示します.

postgres=# \l
docker | postgres | UTF8 | ja_JP.utf8 | ja_JP.utf8 | =Tc/postgres +
| | | | | postgres=CTc/postgres+
| | | | | docker=CTc/postgres
postgres | postgres | UTF8 | ja_JP.utf8 | ja_JP.utf8 |
template0 | postgres | UTF8 | ja_JP.utf8 | ja_JP.utf8 | =c/postgres +
| | | | | postgres=CTc/postgres
template1 | postgres | UTF8 | ja_JP.utf8 | ja_JP.utf8 | =c/postgres +
| | | | | postgres=CTc/postgres

postgres=# \c docker docker
ユーザ docker のパスワード:
データベース "docker" にユーザ"docker"として接続しました。
docker=> \dt
public | auth_group | テーブル | docker

docker=> select * from auth_group;
1 | Gyoumu
2 | Master
3 | System

docker=> \q
日本語化されたイメージを元に、01adduser.shでdockerユーザーを作成してパスワードを設定、dockerデータベースを作り、02createtb.sqlでdockerデータベースdockerユーザーに切り替えてauth_groupテーブルを作成し、データを流し込めていることが確認できました。

Docker Compose で開発用の PostgreSQL を起動する

日本語化したイメージを使用し、initdbのスクリプトで初期化、データの永続化はbusyboxを使用する方針でdocker-compose.ymlを作成します。

docker-composeでmysql & postgreSQL をサクッと起動

を参考にさせていただきました。

docker-compose.yml

postgres-data:
image: busybox
volumes:
- /var/lib/postgresql/data
container_name: postgres-datastore

postgresql:
image: mypostgres:9.6
environment:
POSTGRES_USER: postgres
POSTGRES_PASSWORD: mysecretpassword
volumes:
- ./initdb/:/docker-entrypoint-initdb.d
ports:
- "15432:5432"
container_name: postgres-db
volumes_from:
- postgres-data
起動します。

$ docker-compose up -d
Creating postgres-datastore
Creating postgres-db
以降、使用するあいだはstop・startで停止・起動していく感じでしょうか。

psqlやpgAdmin3で動作確認。OKでしたのでこれからはコレをベースに調整すれば簡単にPostgreSQLを準備できます。

ディレクトリファイル構成は以下のようになりました。

.
├── Dockerfile
├── docker-compose.yml
└── initdb
    ├── 01adduser.sh
    └── 02createtb.sql
murave

Docker for Mac のDockerホストに入るには

どうしたらいいんだろう?

と方法を探していたら以下のページにscreenコマンドでttyに接続すれば良いとの情報がありました。

Docker for Mac プライベートベータを早速使ってみた! – paiza開発日誌

試してみます。

$ screen ~/Library/Containers/com.docker.docker/Data/com.docker.driver.amd64-linux/tty
この後、Enterすると表示が出て、moby login: にrootを入力してEnterでDockerホストに入ることができました。

Docker for Macホストへの接続

添付の画像は私の場合の表示ですが、screenの設定がカスタマイズされているのでおそらく他の方とは異なります。

screen常用者の端末ではカスタマイズされていて他の人には使えないのも常ですので操作方法については別途調べるなどしてください(Ctrl-a ?でヘルプをみることができますがそもそもCtrl-aが変更されていることが多く、例にもれず私もCtrl-zにしてあります)。

私は導入していないのですがtmuxなどでも良いでしょう。たぶん。tmuxについては下記、shunの記事などをどうぞ。

OS X に byobu で tmux 環境をお手軽構築 [2015 冬版]

絶対忘れるのでメモでした。

murave

Mac基本のキ:アプリを32ビットモードで起動する

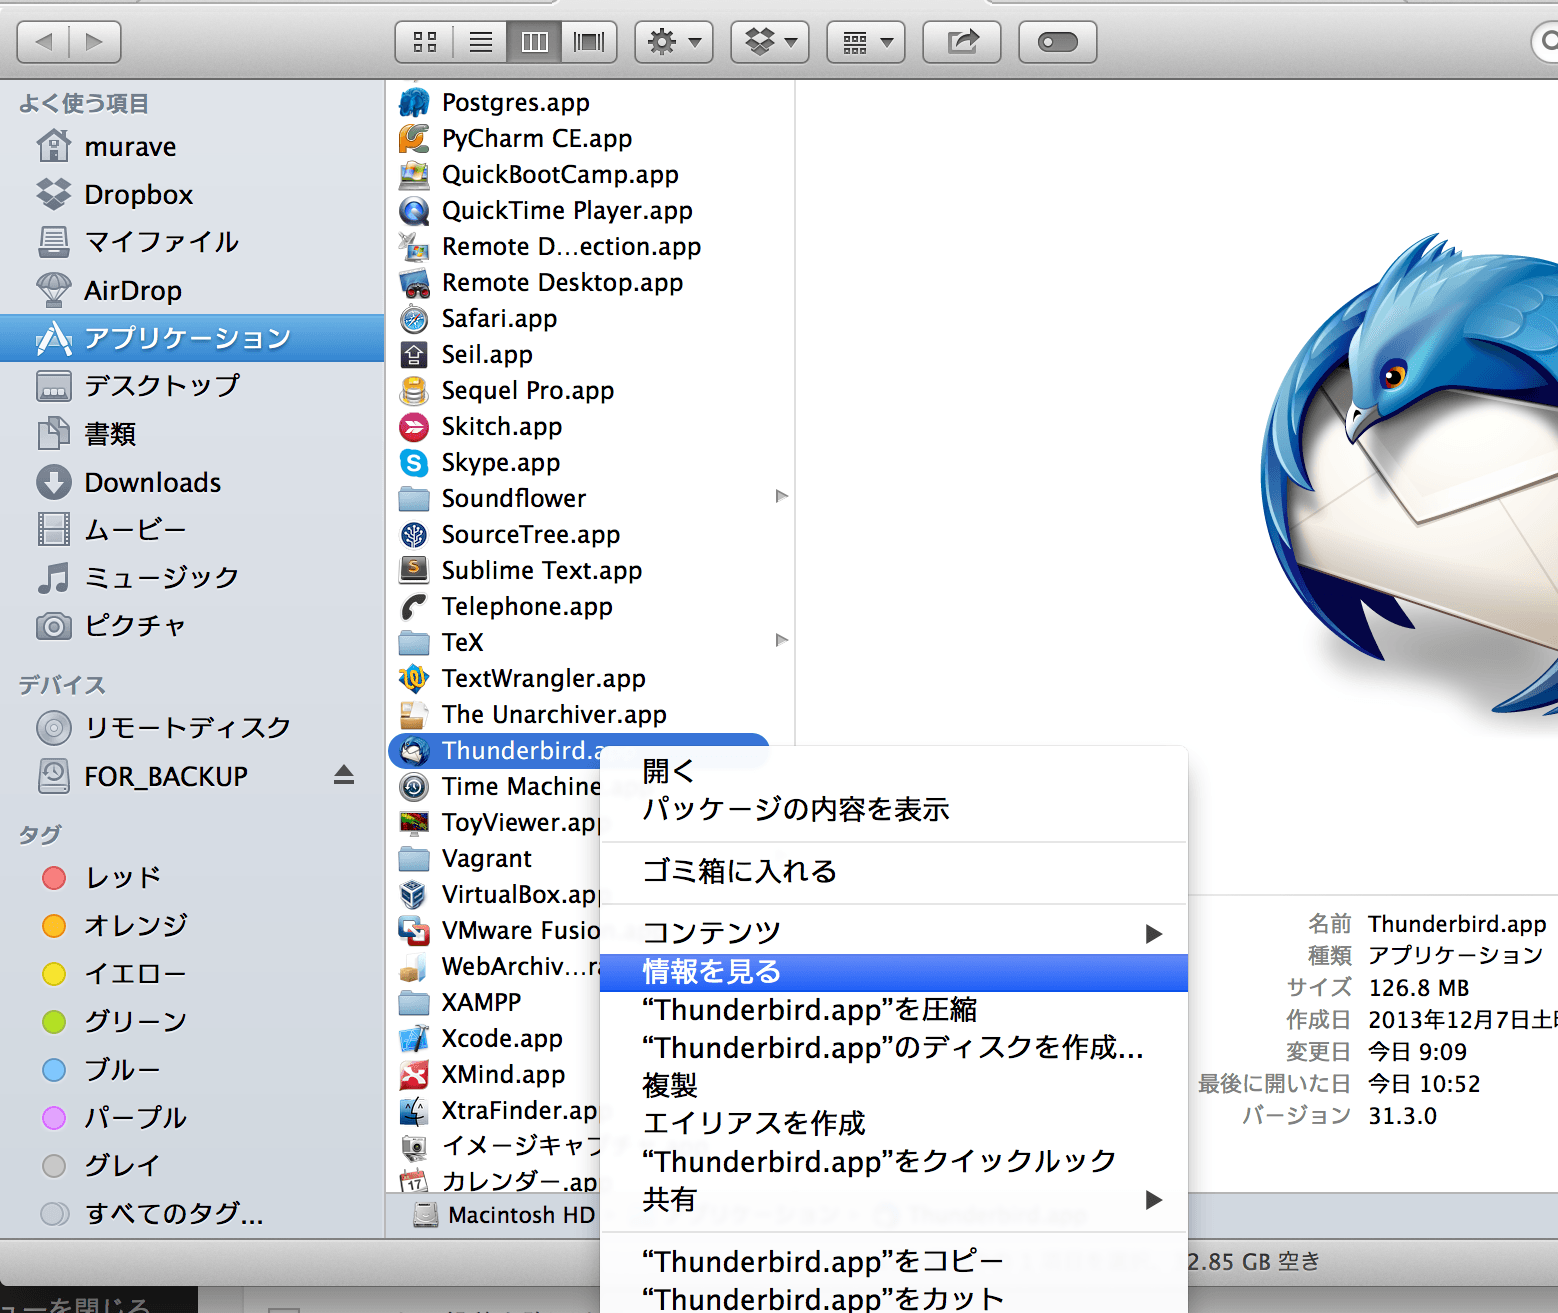
@murave 「32ビットモードで開く」で回避(とりあえず)。Thunderbird.appを右クリックして「情報を見る」から設定。— murave (@murave) January 5, 2015

仕事始めの朝に食らいまいした。あけましておめでとうございます。

今回のように64ビットアプリでトラブルにあったときに32ビットモードで起動すると回避出来たりすることがありますので覚えておくといいことがあるかもしれません。

そして忘れてずっと32ビットモードで暮らしてしまうかもしれません。使えないよりはいいですけどね。

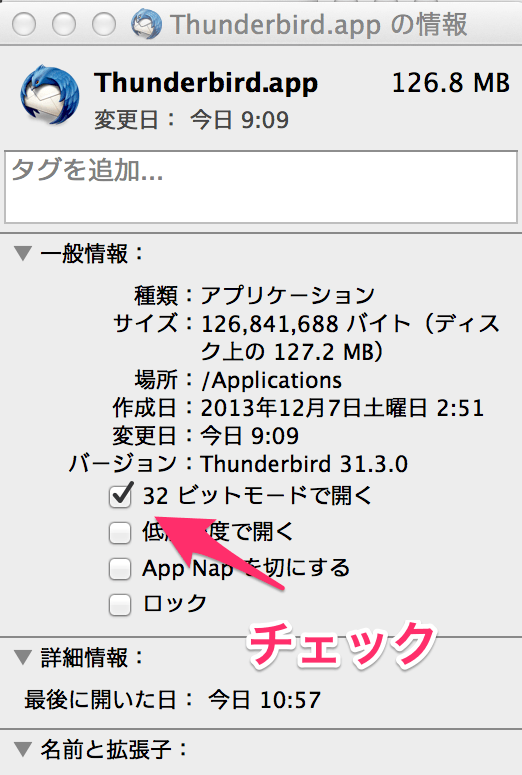
設定方法はつぶやいてるとおりですが、わかりやすいようにキャプチャとってみました。

contextMenu

右クリックして「情報を見る」

Thunderbird_app_の情報

そして「32ビットモードで開く」にチェック。

murave

OS X Mountain Lion セットアップ日記 4 Bazaar激闘編

激闘なんかしたくなかった。

MacOSXDownloads – wiki.bazaar.canonical.com

最新の Stable、Snow Leopard (10.6 – Python 2.6) 2.5.0 をインストールしました。
Mountain Lion 用どころか Lion 用のインストーラーもないんだよね。

でも Bazaar Explorer を起動できたので大丈夫だと思っていた、まだ幸せだった、あの頃。

地獄変

盆休み明けにコードの編集始めようリポジトリを選択したら Bazaar Explorer がぶち落ちやがった。

$ bzr explorer
QKqueueFileSystemWatcherEngine::addPaths: open: Too many open files
〜 250行位略 〜
QKqueueFileSystemWatcherEngine::addPaths: open: Too many open files
QEventDispatcherUNIXPrivate(): Unable to create thread pipe: Too many open files
QEventDispatcherUNIXPrivate(): Can not continue without a thread pipe
zsh: abort bzr explorer

(´・ω・`)

いろいろ試してみるとターミナルから操作しても bzr-svn プラグインでエラーとなることが判明。

$ bzr log
〜 略 〜
revno: 14
committer: Junya Murabe branch nick: trunk
timestamp: Mon 2011-05-09 19:12:41 +0900
message:
chkPassowordCharをapp_modelに移動。chkFilenameChar作成。
bzr: ERROR: exceptions.ImportError: Unable to load subvertpy extensions: dlopen(/Library/Python/2.6/site-packages/subvertpy/repos.so, 2): Symbol not found: _svn_fs__path_change2_create
Referenced from: /usr/lib/libsvn_fs-1.0.dylib
Expected in: /usr/local/lib/libsvn_fs_util-1.0.dylib
in /usr/lib/libsvn_fs-1.0.dylib

Traceback (most recent call last):
File "/Library/Python/2.6/site-packages/bzrlib/commands.py", line 930, in exception_to_return_code
return the_callable(*args, **kwargs)
File "/Library/Python/2.6/site-packages/bzrlib/commands.py", line 1141, in run_bzr
ret = run(*run_argv)
File "/Library/Python/2.6/site-packages/bzrlib/commands.py", line 673, in run_argv_aliases
return self.run(**all_cmd_args)
File "/Library/Python/2.6/site-packages/bzrlib/commands.py", line 697, in run
return self._operation.run_simple(*args, **kwargs)
File "/Library/Python/2.6/site-packages/bzrlib/cleanup.py", line 136, in run_simple
self.cleanups, self.func, *args, **kwargs)
File "/Library/Python/2.6/site-packages/bzrlib/cleanup.py", line 166, in _do_with_cleanups
result = func(*args, **kwargs)
File "/Library/Python/2.6/site-packages/bzrlib/commands.py", line 1158, in ignore_pipe
result = func(*args, **kwargs)
File "/Library/Python/2.6/site-packages/bzrlib/builtins.py", line 2895, in run
Logger(b, rqst).show(lf)
File "/Library/Python/2.6/site-packages/bzrlib/log.py", line 382, in show
self._show_body(lf)
File "/Library/Python/2.6/site-packages/bzrlib/log.py", line 412, in _show_body
lf.log_revision(lr)
File "/Library/Python/2.6/site-packages/bzrlib/log.py", line 1558, in log_revision
lines.extend(self.custom_properties(revision.rev))
File "/Library/Python/2.6/site-packages/bzrlib/log.py", line 1476, in custom_properties
lines = self._foreign_info_properties(revision)
File "/Library/Python/2.6/site-packages/bzrlib/log.py", line 1498, in _foreign_info_properties
foreign.foreign_vcs_registry.parse_revision_id(rev.revision_id)
File "/Library/Python/2.6/site-packages/bzrlib/foreign.py", line 185, in parse_revision_id
foreign_vcs = self.get(revid.split("-")[0])
File "/Library/Python/2.6/site-packages/bzrlib/registry.py", line 177, in get
return self._dict[self._get_key_or_default(key)].get_obj()
File "/Library/Python/2.6/site-packages/bzrlib/registry.py", line 74, in get_obj
self._obj = get_named_object(self._module_name, self._member_name)
File "/Library/Python/2.6/site-packages/bzrlib/pyutils.py", line 51, in get_named_object
obj = __import__(module_name, {}, {}, from_list)
File "/Library/Python/2.6/site-packages/bzrlib/plugins/svn/mapping.py", line 23, in from subvertpy import properties
File "/Library/Python/2.6/site-packages/subvertpy/__init__.py", line 130, in raise ImportError("Unable to load subvertpy extensions: %s" % e)
ImportError: Unable to load subvertpy extensions: dlopen(/Library/Python/2.6/site-packages/subvertpy/repos.so, 2): Symbol not found: _svn_fs__path_change2_create
Referenced from: /usr/lib/libsvn_fs-1.0.dylib
Expected in: /usr/local/lib/libsvn_fs_util-1.0.dylib
in /usr/lib/libsvn_fs-1.0.dylib

bzr 2.6b2 on python 2.6.7 (Darwin-12.0.0-x86_64-i386-64bit)
arguments: ['/usr/local/bin/bzr', 'log']
plugins: bash_completion[2.6b2], bzrtools[2.5.0], changelog_merge[2.6b2],
colo[0.4.0], email[unknown], explorer[1.3.0], fastimport[0.14.0dev],
git[0.6.8], keychain[0.1.0], launchpad[2.6b2], loom[2.2.0],
netrc_credential_store[2.6b2], news_merge[2.6b2], pipeline[1.4.0],
po_merge[2.6b2], qbzr[0.23.0], rewrite[0.6.3], svn[1.2.2], upload[1.1.0],
weave_fmt[2.6b2], xmloutput[0.8.8]
encoding: 'utf-8', fsenc: 'utf-8', lang: 'ja_JP.UTF-8'

*** Bazaar has encountered an internal error. This probably indicates a
bug in Bazaar. You can help us fix it by filing a bug report at
https://bugs.launchpad.net/bzr/+filebug
including this traceback and a description of the problem.

中央リポジトリは Subversion なので死活問題。

解決編

bzr-svn
先に解決したのは bzr-svn。こいつのエラーが原因で explorer も落ちてるのかも?と思っていたので(違ったのですが)先に対処しました。

エラーメッセージを読むと subvertpy でエラーが出ています。調べると Mercurial でも Mountain Lion で Subversion 連携が動作しなくなったとの情報などありました。

JavelinDev ブログ: Mountain Lionでpython関係のライブラリが動かなくなったのを復旧した手順

bzr-svn も subvertpy でエラーが起きているので入れなおすことにしました。インストールの邪魔になるので、まず、元のファイルをどかします。消すのは怖いので mv しました。

$ sudo mv /Library/Python/2.6/site-packages/subvertpy ~/
$ sudo mv /Library/Python/2.6/site-packages/subvertpy-0.8.10-py2.6.egg-info ~/

そしてインストール。

$ sudo easy_install-2.6 subvertpy

bzr-svn 復活!

$ bzr commit
Committing to: svn+http://###.###.###.###/##/#######
modified app/controllers/jobs_controller.php
/Library/Python/2.6/site-packages/bzrlib/plugins/svn/commit.py:252: DeprecationWarning: bzrlib.revisiontree.InventoryRevisionTree._get_inventory was deprecated in version 2.5.0.
for child_name, child_ie in base_tree.inventory[file_id].children.iteritems():
/Library/Python/2.6/site-packages/bzrlib/plugins/svn/commit.py:703: DeprecationWarning: bzrlib.revisiontree.InventoryRevisionTree._get_inventory was deprecated in version 2.5.0.
return self.old_tree.inventory[file_id]
/Library/Python/2.6/site-packages/bzrlib/plugins/svn/commit.py:685: DeprecationWarning: bzrlib.revisiontree.InventoryRevisionTree._get_inventory was deprecated in version 2.5.0.
old_ie = self.old_tree.inventory[file_id]
/Library/Python/2.6/site-packages/bzrlib/plugins/svn/commit.py:303: DeprecationWarning: bzrlib.revisiontree.InventoryRevisionTree._get_inventory was deprecated in version 2.5.0.
base_tree.inventory[child_ie.file_id].parent_id != child_ie.parent_id):
/Library/Python/2.6/site-packages/bzrlib/plugins/svn/commit.py:364: DeprecationWarning: bzrlib.revisiontree.InventoryRevisionTree._get_inventory was deprecated in version 2.5.0.
base_tree.inventory[child_ie.file_id].parent_id != child_ie.parent_id):
Committed revision 83.

commit 時に非推奨ワーニング(DeprecationWarning)がでたりしてますが動作しているようです。

Bazaar Explorer
Bug #926439 “Can’t open project in GUI “Too many open files”” : Bugs : Bazaar Explorer

の #9 にあげてくださってる workaround-926439.patch で解決しました。

$ cd /Library/Python/2.6/site-packages/bzrlib/plugins/explorer
$ sudo patch -p0 -b < ~/Downloads/workaround-926439.patch

ここにたどり着くまで、長かった。

調べたりやってみたりしたけどたぶん無駄だったこと

プリインストールの Python が2.7系も入るようになったので(Lionから?)2.6系を使用している Bazaar が動かなくなるという不具合が過去に発生していたようです。コードを見たところこの不具合への対処は入っていました。

Bazaar Explorer が落ちる件、ダウンロードページに「 QT をバージョンアップしてみなよ」とか書いてあるので QT の再インストールを何通りかの方法でやってみましたが症状は変わりませんでした。結果的に Homebrew で入れた QT を使用している状態ですが今回のエラー対処には影響していないとおもいます(たぶん)。

こんな状態だと Bazaar 、オススメできないなぁ。