AlexaでChatGPT
ChatGPT APIを使ったチャットボットをAlexaスキルで作リました。
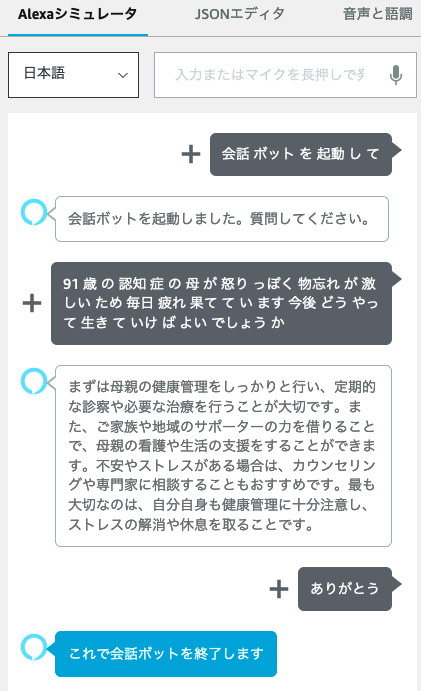
Alexaシミュレータの表示
準備
Serverless Frameworkを使い、AWS Lambdaを作成・デプロイします。
事前に以下の準備をします。
- OpenAIのアカウントを作成しAPIキーを生成
- AWS CLIでログインできるように、AWS IAMユーザを作成しておく
- npm install -g serverlessでServerless Frameworkをインストール
ファイルの作成
以下のコマンドでテンプレートからファイルを作成します。
sls create -t aws-alexa-typescript -p alexa_chatgpt
生成したファイルserverless.ymlを見ると、Step 1〜8 が書かれています。基本、この通りにやっていきます。
最初にnpm installします。sls alexa authでAmazon開発者アカウントのログインを行います。
serverless.ymlを更新
以下のように修正しました。
service: alexa-chatgpt

# app and org for use with dashboard.serverless.com
#app: your-app-name
#org: your-org-name

frameworkVersion: '3'

plugins:
  - serverless-webpack
  - serverless-alexa-skills

provider:
  name: aws
  runtime: nodejs18.x
  region: ap-northeast-1
  environment:
    OPENAI_API_KEY: ${env:OPENAI_API_KEY}
custom:
  alexa:
    # Step 1: Run `sls alexa auth` to authenticate
    # Step 2: Run `sls alexa create --name "Serverless Alexa Typescript" --locale en-GB --type custom` to create a new skill
    skills:
      # Step 3: Paste the skill id returned by the create command here:
      - id: amzn1.ask.skill.xxxx-xxxx-xxxx-xxxx-xxxx
        manifest:
          publishingInformation:
            locales:
              ja-JP:
                name: 会話ボット
          apis:
            custom:
              endpoint:
                # Step 4: Do your first deploy of your Serverless stack
                # Step 5: Paste the ARN of your lambda here:
                uri: arn:aws:lambda:[region]:[account-id]:function:[function-name]
                # Step 6: Run `sls alexa update` to deploy the skill manifest
                # Step 7: Run `sls alexa build` to build the skill interaction model
                # Step 8: Enable the skill in the Alexa app to start testing.
          manifestVersion: '1.0'
        models:
          ja-JP:
            interactionModel:
              languageModel:
                invocationName: 会話ボット
                intents:
                  - name: PromptIntent
                    slots:
                    - name: Content
                      type: AMAZON.City
                    samples:
                      - '{Content}'
                  - name: AMAZON.StopIntent
                    samples:
                      - 'ストップ'
                      - '終了'
                      - '止めて'
                      - '終わり'
                      - 'さようなら'
                      - 'ありがとう'
functions:
  alexa:
    handler: handler.alexa
    events:
      - alexaSkill: ${self:custom.alexa.skills.0.id}
    timeout: 60
主な変更箇所は以下です。
runtimeをnodejs18.*に修正regionをap-northeast-1に修正- 環境変数
OPENAI_API_KEYの設定 - custom → alexa → skills → models でintents及びsamplesの設定
- functions → alexa → timeout でLambdaのタイムアウトの設定
アレクサスキルの作成
以下のコマンドでアレクサスキルの作成します。
sls alexa create --name "会話ボット" --locale ja-JP --type custom
Alexa developer consoleに作成したスキルが表示されます。
出力されたスキルIDをserverless.ymlのcustom → alexa → skills → idにセットします。
Lambdaの作成
handler.tsファイルを以下のようにしました。
import {
  ErrorHandler,
  HandlerInput,
  RequestHandler,
  SkillBuilders,
} from 'ask-sdk-core';
import {
  Response,
} from 'ask-sdk-model';
import 'source-map-support/register';
import chatgpt from './chatgpt';

const ErrorHandler : ErrorHandler = {
  canHandle(handlerInput : HandlerInput, error : Error ) : boolean {
    return true;
  },
  handle(handlerInput : HandlerInput, error : Error) : Response {
    console.error('error!!!');
    console.error(error);

    return handlerInput.responseBuilder
      .speak('すみません。コマンドを理解できませんでした。もう一度言ってください。')
      .reprompt('すみません。コマンドを理解できませんでした。もう一度言ってください。')
      .getResponse();
  }
};

const LaunchRequestHandler : RequestHandler = {
  canHandle(handlerInput : HandlerInput) : boolean {
    const request = handlerInput.requestEnvelope.request;
    return request.type === 'LaunchRequest';
  },
  handle(handlerInput : HandlerInput) : Response {
    const speechText = '会話ボットを起動しました。質問してください。';

    return handlerInput.responseBuilder
      .speak(speechText)
      .reprompt(speechText)
      .withSimpleCard(speechText, speechText)
      .getResponse();
  },
};

const PromptIntentHandler : RequestHandler = {
  canHandle(handlerInput : HandlerInput) : boolean {
    const request = handlerInput.requestEnvelope.request;
    return request.type === 'IntentRequest'
      && request.intent.name === 'PromptIntent';
  },
  async handle(handlerInput : HandlerInput) : Promise<Response> {
    const request = handlerInput.requestEnvelope.request;
    if (request.type !== 'IntentRequest') return;

    try {
      let sessionAttributes = handlerInput.attributesManager.getSessionAttributes();
      if (!('messages' in sessionAttributes)) {
        sessionAttributes.messages = [
          {"role": "system", "content": "あなたはスマートスピーカーです。150文字以内で回答してください。"},
        ];
      }
      const question = request.intent.slots.Content.value;
      sessionAttributes.messages.push(
        {"role": "user", "content": question},
      );
      const resonseContent = await chatgpt.createChat(sessionAttributes.messages);
      sessionAttributes.messages.push(
        {"role": "assistant", "content": resonseContent}
      );
      handlerInput.attributesManager.setSessionAttributes(sessionAttributes);
      return handlerInput.responseBuilder
      .speak(resonseContent)
      .reprompt('何か問いかけてみてください')
      .withSimpleCard('回答', resonseContent)
      .getResponse();
    } catch (e) {
      console.error(e)
    }
  },
};

const CancelAndStopIntentHandler : RequestHandler = {
  canHandle(handlerInput : HandlerInput) : boolean {
    const request = handlerInput.requestEnvelope.request;
    return request.type === 'IntentRequest'
      && (request.intent.name === 'AMAZON.CancelIntent'
         || request.intent.name === 'AMAZON.StopIntent');
  },
  handle(handlerInput : HandlerInput) : Response {
    const speechText = 'これで会話ボットを終了します';
    console.log('bye!!')
    return handlerInput.responseBuilder
      .speak(speechText)
      .withSimpleCard(speechText, speechText)
      .withShouldEndSession(true)
      .getResponse();
  },
};

export const alexa = SkillBuilders.custom()
  .addRequestHandlers(
    LaunchRequestHandler,
    PromptIntentHandler,
    CancelAndStopIntentHandler,
  )
  .addErrorHandlers(ErrorHandler)
  .lambda();
また、chatgpt.tsファイルを作成し、以下のようにしました。
const { Configuration, OpenAIApi } = require("openai");
const configuration = new Configuration({
  apiKey: process.env.OPENAI_API_KEY,
});
const openai = new OpenAIApi(configuration);


const createChat = async (messages: any): Promise<string> => {
    console.log('messages', messages);
    const res = await openai.createChatCompletion({
        model: "gpt-3.5-turbo",
        messages,
    });
    const responseContent = res.data.choices[0].message.content;
    console.log('"' + responseContent + '"');
    return responseContent;
}

export default {
    createChat
}
PromptIntentでrepromptを設定することで、1回の会話でセッションが終了せず、連続して会話が行えます。
会話の終了は、StopIntentを呼びます(例「ありがとう」)。
また、スキルセッションに会話履歴を保存し、プロンプトに質問と一緒に投げることで同一セッションではコンテキストが維持されます。
AWS Lambdaのデプロイ
以下のコマンドでAWS Lambdaのデプロイします。
sls deploy
デプロイする前に、環境変数OPENAI_API_KEYをexportする必要があります。
export OPENAI_API_KEY=********
また、私の環境ではerror:0308010C:digital envelope routines::unsupportedというエラーが出たので、以下の設定後にsls deployを実行しました。
export NODE_OPTIONS=--openssl-legacy-provider
デプロイ後、Lambda関数のARNをserverless.ymlのcustom → alexa → skills → id → apis → custom → endpoint → uriにセットします。
スキルマニフェストのデプロイおよびビルド
以下のコマンドでスキルマニフェストのデプロイおよびビルドを行います。
sls alexa update
sls alexa build
テスト
Alexa developer consoleのテストタブで状態を「開発中」にすると、Alexaシミュレータおよび実機でテストを行えます。
課題
OpenAIのレスポンスが遅いため、Alexaがタイムアウトしてしまうことがあります。Alexaのタイムアウトは8秒です。
この対応として、以下のようにすればタイムアウトしないようになるかもしれません。
createChatCompletionのオプションのsteramをtrueにします。そうするとWEB版ChatGPTのように1文字毎にレスポンスが送られてきます。改行コードが送られてきたら、その地点までに送られた文字列をresponseBuilderのspeakメソッドに渡して実行します。