Posts Tagged ‘Xcode’
Fastlaneの基本 〜gym入れてみる〜
Fastlaneファイルの基本構造を確認したところで、
次にパッケージを1つ動かしてみようと思います
gymを入れてみました。ipaファイルを作るパッケージです
sudo gem install gymでインストールします
test:FastlaneTest test$ gym --workspace "FastlaneTest.xcodeproj/project.xcworkspace" --scheme "FastlaneTest" --clean --use_legacy_build_api
[11:38:10]: Using legacy build system - waiting for radar to be fixed: https://openradar.appspot.com/radar?id=4952000420642816
[11:38:10]: xcrun xcodebuild -list -workspace 'FastlaneTest.xcodeproj/project.xcworkspace'

+----------------------+--------------------------------------------+
|                       Summary for gym 1.6.2                       |
+----------------------+--------------------------------------------+
| workspace            | FastlaneTest.xcodeproj/project.xcworkspace |
| scheme               | FastlaneTest                               |
| clean                | true                                       |
| use_legacy_build_api | true                                       |
| destination          | generic/platform=iOS                       |
| output_name          | FastlaneTest                               |
| output_directory     | .                                          |
| silent               | false                                      |
| buildlog_path        | ~/Library/Logs/gym                         |
+----------------------+--------------------------------------------+

〜中略〜

[11:38:34]: Successfully exported and compressed dSYM file
[11:38:34]: Successfully exported and signed the ipa file:
[11:38:34]: /Users/test/WorkSpace/test/FastlaneTest/FastlaneTest.ipa
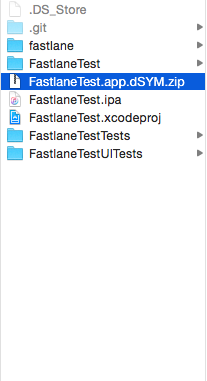
ipaファイルができていることが確認できます!
—use_legacy_build_api をパラメータに入れていないと
“The operation couldn’t be completed. (IDEDistributionErrorDomain error 1.)”
というエラーが発生するようです(参考:http://qiita.com/takecian/items/6d34448d61c69e0d4a7f)
以上を確認した上で、最初に作ったFastlaneファイルにgymを入れてみます
  1 fastlane_version "1.81.0"
  2 default_platform :ios
  3
  4 platform :ios do
  5   before_all do
  6     say ["before all"]
  7   end
  8
  9   desc "テストですよー"
 10   lane :test do
 11     gym(
 12     workspace: "FastlaneTest.xcodeproj/project.xcworkspace",
 13     scheme: "FastlaneTest",
 14     clean: true,
 15     use_legacy_build_api: true
 16     )
 17   end
 18
 19   desc "テストですよー2"
 20   lane :test2 do |options|
 21     say [options[:hoge]]
 22   end
 23
 24   after_all do |lane|
 25     say ["after all"]
 26   end
 27
 28   error do |lane, exception|
 29     say ["エラー"]
 30   end
 31 end
ipaファイルを消して実行
test:fastlane test$ fastlane test
[14:29:08]: -------------------------------------------------
[14:29:08]: --- Step: Verifying required fastlane version ---
[14:29:08]: -------------------------------------------------
[14:29:08]: fastlane version valid
[14:29:08]: ------------------------------
[14:29:08]: --- Step: default_platform ---
[14:29:08]: ------------------------------
[14:29:08]: Driving the lane 'ios test' 🚀
[14:29:08]: -----------------
[14:29:08]: --- Step: say ---
[14:29:08]: -----------------
[14:29:08]: $ say 'before all'
[14:29:10]: -----------------
[14:29:10]: --- Step: gym ---
[14:29:10]: -----------------
[14:29:10]: Using legacy build system - waiting for radar to be fixed: https://openradar.appspot.com/radar?id=4952000420642816
[14:29:10]: xcrun xcodebuild -list -workspace 'FastlaneTest.xcodeproj/project.xcworkspace'

+----------------------+--------------------------------------------+
|                       Summary for gym 1.6.2                       |
+----------------------+--------------------------------------------+
| workspace            | FastlaneTest.xcodeproj/project.xcworkspace |
| scheme               | FastlaneTest                               |
| clean                | true                                       |
| use_legacy_build_api | true                                       |
| destination          | generic/platform=iOS                       |
| output_name          | FastlaneTest                               |
| output_directory     | .                                          |
| silent               | false                                      |
| buildlog_path        | ~/Library/Logs/gym                         |
+----------------------+--------------------------------------------+

〜中略〜

[14:29:45]: Successfully exported and compressed dSYM file
[14:29:45]: Successfully exported and signed the ipa file:
[14:29:45]: /Users/test/WorkSpace/test/FastlaneTest/FastlaneTest.ipa
[14:29:45]: -----------------
[14:29:45]: --- Step: say ---
[14:29:45]: -----------------
[14:29:45]: $ say 'after all'

+------+-------------------------------------+-------------+
|                     fastlane summary                     |
+------+-------------------------------------+-------------+
| Step | Action                              | Time (in s) |
+------+-------------------------------------+-------------+
| 1    | Verifying required fastlane version | 0           |
| 2    | default_platform                    | 0           |
| 3    | say                                 | 1           |
| 4    | gym                                 | 35          |
| 5    | say                                 | 1           |
+------+-------------------------------------+-------------+

[14:29:46]: fastlane.tools finished successfully 🎉
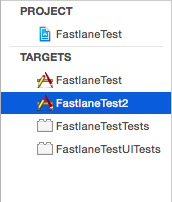
例えば、FastlaneTestスキーマをコピーしたFastlane2も
 10   lane :test do
 11     gym(
 12     workspace: "FastlaneTest.xcodeproj/project.xcworkspace",
 13     scheme: "FastlaneTest2",
 14     clean: true,
 15     use_legacy_build_api: true
 16     )
とschemeの値を編集すれば同じようにipaファイルが作成されます
次はリリースまでの一通りのパッケージを入れた状態のFastlaneファイルを用意してみようかと思います
Fastlaneの基本 〜構造を知る〜
iOSアプリ生成時のコストを下げる事を目標にFastlaneを勉強中なのですが、
検索かけてもなかなかまとまった記事が見つからないので
自分の脳内整理の為に簡潔にまとめてみました
テスト用ということで、まずViewControllerを1つ用意したFastlaneTestというプロジェクトを作り、
Fastlaneをインストールして早速動作確認
Fastlaneファイルの基本構造こんな感じ
1 fastlane_version "1.81.0"
2 default_platform :ios
3
4 platform :ios do
5 before_all do
6 say ["before all"]
7 end
8
9 desc "テストですよー"
10 lane :test do
11 say ["テストですよー"]
12 end
13
14 desc "テストですよー2"
15 lane :test2 do |options|
16 say [options[:hoge]]
17 end
18
19 after_all do |lane|
20 say ["after all"]
21 end
22
23 error do |lane, exception|
24 say ["エラー"]
25 end
26 end
fastlane [lane名]で実行します
そうするとbefore_all→[lane名]→after_allの順番で走ることがわかります
因みにsay[]はボイスが流れるactionです
エラーが発生した場合はerrorの中身が走り、after_allは実行されません
test:fastlane test$ fastlane test
[12:06:55]: -------------------------------------------------
[12:06:55]: --- Step: Verifying required fastlane version ---
[12:06:55]: -------------------------------------------------
[12:06:55]: fastlane version valid
[12:06:55]: ------------------------------
[12:06:55]: --- Step: default_platform ---
[12:06:55]: ------------------------------
[12:06:55]: Driving the lane 'ios test' 🚀
[12:06:55]: -----------------
[12:06:55]: --- Step: say ---
[12:06:55]: -----------------
[12:06:55]: $ say 'before all'
[12:06:56]: -----------------
[12:06:56]: --- Step: say ---
[12:06:56]: -----------------
[12:06:56]: $ say 'テストですよー'
[12:06:58]: -----------------
[12:06:58]: --- Step: say ---
[12:06:58]: -----------------
[12:06:58]: $ say 'after all'

+------+-------------------------------------+-------------+
| fastlane summary |
+------+-------------------------------------+-------------+
| Step | Action | Time (in s) |
+------+-------------------------------------+-------------+
| 1 | Verifying required fastlane version | 0 |
| 2 | default_platform | 0 |
| 3 | say | 1 |
| 4 | say | 1 |
| 5 | say | 1 |
+------+-------------------------------------+-------------+

[12:06:59]: fastlane.tools finished successfully 🎉
test:fastlane test$ fastlane test2 hoge:aaa
[17:53:38]: -------------------------------------------------
[17:53:38]: --- Step: Verifying required fastlane version ---
[17:53:38]: -------------------------------------------------
[17:53:38]: fastlane version valid
[17:53:38]: ------------------------------
[17:53:38]: --- Step: default_platform ---
[17:53:38]: ------------------------------
[17:53:38]: Driving the lane 'ios test2' 🚀
[17:53:38]: -----------------
[17:53:38]: --- Step: say ---
[17:53:38]: -----------------
[17:53:38]: $ say 'before all'
[17:53:39]: -----------------
[17:53:39]: --- Step: say ---
[17:53:39]: -----------------
[17:53:39]: $ say 'aaa'
[17:53:40]: -----------------
[17:53:40]: --- Step: say ---
[17:53:40]: -----------------
[17:53:40]: $ say 'after all'

+------+-------------------------------------+-------------+
| fastlane summary |
+------+-------------------------------------+-------------+
| Step | Action | Time (in s) |
+------+-------------------------------------+-------------+
| 1 | Verifying required fastlane version | 0 |
| 2 | default_platform | 0 |
| 3 | say | 1 |
| 4 | say | 1 |
| 5 | say | 1 |
+------+-------------------------------------+-------------+

[17:53:41]: fastlane.tools finished successfully 🎉
今回はここまで
次回はgymを入れてipaファイルを作ってみようと思います
MobiRubyのサンプル作りました(動画付)
新着情報、『9/22(土) Rubyビジネス・コモンズが「【RBC Tech Saturday】MobiRubyでiOSアプリをつくろう ~スマホアプリ開発にmrubyがやってきた~」を開催します』でお知らせしておりますとおり、明日、引越し前の弊社新オフィスでRBCのMobiRubyイベントを開催します。まだ参加枠あります。ぜひ!
さて、本題。このイベント用に簡単なサンプルを作成しました。
起動するとBGMを演奏、中央にキャラクターを表示。画面をタッチすると効果音をならしてタッチ先にキャラクターがアニメーションで移動します。
再生すると音がでます。
BGMと効果音はユウラボ8bitサウンド工房のものを使用させていただいています。
ソースコード(roundnyaabe.rb)を貼ります。
samegame用のext.rbを使わせてもらっているので頭でrequireしています。
require 'ext'

def CGPointMake(x, y)
    point = Cocoa::Struct::CGPoint.new
    point[:x], point[:y] = x.to_f, y.to_f
    return point
end

class Cocoa::MyViewController < Cocoa::UIViewController

    define C::Void, :viewDidLoad do
        #背景(黒)
        screen_rect = Cocoa::UIScreen._mainScreen._bounds
        background_view = Cocoa::UIView._alloc._initWithFrame(screen_rect)
        background_view._setBackgroundColor(Cocoa::UIColor._blackColor)
        self._view._addSubview(background_view)

        #にゃ〜ぶ登場
        @nyaabe_image_view = Cocoa::UIImageView._alloc._initWithFrame(CGRectMake(0, 0, 50, 50))
        @nyaabe_image_view._setImage(Cocoa::UIImage._imageNamed(_S("nyaabe_iphone.png")))
        point = Cocoa::Struct::CGPoint.new
        point[:x] = (screen_rect[:size][:width] / 2).to_f
        point[:y] = (screen_rect[:size][:height] / 2).to_f
        @nyaabe_image_view._setCenter(point)
        self._view._addSubview(@nyaabe_image_view)
    end

    def calcPosition(touches)
        touch = touches._anyObject
        location = touch._locationInView(self._view)
        x = location[:x]
        y = location[:y]
        return [x, y]
    end

    define C::Void, :touchesBegan, Cocoa::Object, :withEvent, Cocoa::Object do |touches, event|
        (@touchesBeganLock ||= Mutex.new).block do
            x, y = calcPosition(touches)
            C::call C::Void, "AudioServicesPlaySystemSound", $tap_se
            p ":touchesBegan x:#{x}, y:#{y}"
            nyaabe_move_to(x, y)
        end
    end

    def nyaabe_move_to(x, y)
        #アニメーション
        context = C::call(C::Pointer, "UIGraphicsGetCurrentContext")
        Cocoa::UIView._beginAnimations nil, :context, context
        Cocoa::UIView._setAnimationDuration C::Double(0.2)
        Cocoa::UIView._setAnimationCurve Cocoa::Const::UIViewAnimationCurveLinear

        point = CGPointMake(x, y)
        @nyaabe_image_view._setCenter(point)

        Cocoa::UIView._commitAnimations
    end

end

#BGM
bgm = AudioPlayer.new("sht_a05", "mp3")
bgm.loops = -1
bgm.volume = 0.25
bgm.play

#効果音初期化
soundPath = Cocoa::NSBundle._mainBundle._pathForResource _S("se_byuin"), :ofType, _S("mp3")
soundURL = Cocoa::NSURL._fileURLWithPath soundPath
$tap_se = C::Int(0)
C::call C::Void, "AudioServicesCreateSystemSoundID", soundURL, $tap_se.to_pointer

screen_rect = Cocoa::UIScreen._mainScreen._bounds
$window = Cocoa::UIWindow._alloc._initWithFrame screen_rect
$viewController = Cocoa::MyViewController._alloc._init

$window._addSubview $viewController._view

$window._makeKeyAndVisible
今日は福岡で開催されるmrubyのセミナーに参加するのでこれから福岡に移動です。
mrubyのことがわかったらMobiRubyのことがもっとわかるはず。たのしみ!
OS X Mountain Lion セットアップ日記 3 Xcode&Homebrew etc
Git や Subversion、他もろもろのインストールで必要なのでパッケージ管理システムを入れます。
以前は MacPorts を使っていたのですが最近はめっきり Homebrew です。
http://mxcl.github.com/homebrew/
「Xcode は Mac App Store から入れるんだよな。あとはターミナルから
ruby <(curl -fsSkL raw.github.com/mxcl/homebrew/go) で一発やで〜」
ダメでした。Xcode 入れただけじゃコマンドラインツールが入らなくなったのね。
コマンドラインツールは Xcode の Preferences の Downloads からインストールできました。

さっきも書きましたがHomebrewのインストールはターミナルで
ruby <(curl -fsSkL raw.github.com/mxcl/homebrew/go)
一発です。すばらしい。
あとは心のおもむくままに Homebrew で必要なパッケージを入れていきましょう。
特に Subversion は日本語ファイルの扱いに関するパッチが適用された状態でインストールできるので Homebrew で入れるのをオススメします。
brew install subversion --unicode-path
Homebrew は便利ですが perl と ruby は別の方法で入れます(デフォで入ってますが新しいのを入れる場合の話ね)。
perl は perlbrew。CentOS の場合については以前ブログに書きましたね。
メモ:CentOS 5.5 で perlbrew + cpanminus
基本的に同じです。
ruby は rbenv+ruby-build で入れます。
rbenv と ruby-build 自体は Homebrew でインストールできます。
以前は rvm を使ってたんですが切り替えました。
どちらでも良いと思いますが複数のバージョンを切り替えられるようにしておいたほうがいいです。
Xcodeでリリースビルド時に.dmgを自動生成する
こちらを参考に、hdiutilを使ってリリースビルド時のみ生成するようにしてみました。
グループとファイルからビルドターゲットを右クリックし、[追加 > 新規ビルドフェーズ > 新規スクリプトを実行]を選択します。

スクリプトを入力する画面が表示されますので、下記のようにスクリプトを設定します。.dmgはデスクに保存するようにしています。cpしているところは適時置き換えて頂ければいいかと思います。
set -ex

[ "$ACTION" = build ] || exit 0
[ "$BUILD_VARIANTS" = "normal" ] || exit 0
[ "$CONFIGURATION" = "Release" ] || exit 0

dir="$TEMP_FILES_DIR/disk"
dmg="$HOME/Desktop/$PROJECT_NAME.dmg"

rm -rf "$dir"
mkdir "$dir"
cp -R "$BUILT_PRODUCTS_DIR/$PROJECT_NAME.app" "$dir"
cp -R "$PROJECT_DIR/README.txt" "$dir"
cp -R "$PROJECT_DIR/LICENSE.txt" "$dir"
ln -s "/Applications" "$dir/Applications"
rm -f "$dmg"
hdiutil create -srcfolder "$dir" -volname "$PROJECT_NAME" "$dmg"
rm -rf "$dir"